Wednesday, November 14, 2018

Hspec with QuickCheck

This blog post will not describe what property testing is, there are other writings about it. Instead, I'll try to show you how to get started with it, as finding introductory tutorials on the topic is scarce, this is my attempt to fill that void.

I heard about property-based testing in 2015, when I attended Michael Nygaard’s StrangeLoop talk. As a long time TDD-er, I was highly skeptical of generating tests for my own code, but the idea started to grow on me.

Where would I use property testing in a real project? I was presented with a task at my job to solve this: "Write QuickCheck tests for a loan amortization algorithm. It has a starting amount, a term length (in month) and an interest rate. The test should verify:

  • The loan is paid back
  • The term length matches the input argument
  • The principal is shrinking every month"

I was eager to work on this task, however, practical examples were limited. The best information was in the book Haskell Programming from First Principles. I kept coming back to its chapter on testing to pick up what I know.

I wanted to learn with a simple example, I chose the Roman Numeral kata. The converter has 2 functions:

  • Convert Arabic to Roman (convertToRoman)
  • Convert the Roman back to Arabic (convertFromRoman)

Following the reverse list example should be trivial: converting an Arabic number to Roman and back to Arabic should give the same number. The Haskell Book is using a similar example with morse code conversions.

I'll go through the good old TDD solution of the Roman Numeral kata in less detail, as the goal of this post is to describe how to use QuickCheck.

Here is how the code starts out:

module RomanNumeralsSpec where

import Test.Hspec

main :: IO ()
main = hspec spec

type Roman = String

convertToRoman :: Int -> Roman
convertToRoman 1 = "I"
convertToRoman 2 = "II"
convertToRoman 3 = "III"
convertToRoman 4 = "IV"

convertFromRoman :: Roman -> Int
convertFromRoman "" = undefined

spec :: Spec
spec =
  describe "Converting to Roman Numerals" $ do
    it "converts 1 to I" $
      convertToRoman 1 `shouldBe` "I"
    it "converts 2 to II" $
      convertToRoman 2 `shouldBe` "II"
    it "converts 3 to III" $
      convertToRoman 3 `shouldBe` "III"
    it "converts 4 to IV" $
      convertToRoman 4 `shouldBe` "IV"

Look how dumb the test cases (and the code itself) are so far. When I introduce custom data types and a rule table for the conversions, the code becomes much simpler. Watch this:

...

type Conversions = [(Int, Roman)]

conversions :: Conversions
conversions =
  [ (4, "IV")
  , (1, "I") ]

convertToRoman :: Int -> Roman
convertToRoman 0 = []
convertToRoman x =
  roman ++ convertToRoman (x - number)
    where
      (number, roman) =
        head . filter (\(a,_) -> a <= x) $ conversions

...

Commit Point

Extending this now is easy, I don't have to modify the logic, just add more values to the conversions table.

...

conversions :: Conversions
conversions =
  [ (90, "XC")
  , (50, "L")
  , (40, "XL")
  , (10, "X")
  , (9, "IX")
  , (5, "V")
  , (4, "IV")
  , (1, "I") ]

...

spec :: Spec
spec =
  describe "Converting to Roman Numerals" $ do
    it "converts 1 to I" $
      convertToRoman 1 `shouldBe` "I"
    it "converts 2 to II" $
      convertToRoman 2 `shouldBe` "II"
    it "converts 3 to III" $
      convertToRoman 3 `shouldBe` "III"
    it "converts 4 to IV" $
      convertToRoman 4 `shouldBe` "IV"
    it "converts 5 to V" $
      convertToRoman 5 `shouldBe` "V"
    it "converts 6 to VI" $
      convertToRoman 6 `shouldBe` "VI"
    it "converts 8 to VIII" $
      convertToRoman 8 `shouldBe` "VIII"
    it "converts 9 to IX" $
      convertToRoman 9 `shouldBe` "IX"
    it "converts 10 to X" $
      convertToRoman 10 `shouldBe` "X"
    it "converts 11 to XI" $
      convertToRoman 11 `shouldBe` "XI"
    it "converts 99 to L" $
      convertToRoman 99 `shouldBe` "XCIX"

Commit point

Oh, these tests are ugly. I'll make them a bit worse before I improve them, sorry about that.

The conversions table can be used to convert Roman numbers to Arabic. The Arabic value is accumulated by adding the matched values together.

Here are the conversion code and the accompanying tests:

...
import Data.List (isPrefixOf, find)
import Data.Maybe (fromJust)
...

convertFromRoman :: Roman -> Int
convertFromRoman "" = 0
convertFromRoman r =
  number + convertFromRoman (drop (length roman) r)
    where
      (number, roman) = fromJust $ find (\(_,r') -> r' `isPrefixOf` r) conversions

  ...

    describe "Roman to Number Conversions" $ do
    it "converts I to 1" $
      convertFromRoman "I" `shouldBe` 1
    it "converts II to 2" $
      convertFromRoman "II" `shouldBe` 2
    it "converts III to 3" $
      convertFromRoman "III" `shouldBe` 3
    it "converts IV to 4" $
      convertFromRoman "IV" `shouldBe` 4
    it "converts V to 5" $
      convertFromRoman "V" `shouldBe` 5
    it "converts VIII to 8" $
      convertFromRoman "VIII" `shouldBe` 8
    it "converts IX to 9" $
      convertFromRoman "IX" `shouldBe` 9
    it "converts X to 10" $
      convertFromRoman "X" `shouldBe` 10
    it "converts XI to 11" $
      convertFromRoman "XI" `shouldBe` 11
    it "converts XCIX to 99" $
      convertFromRoman "XCIX" `shouldBe` 99

Commit Point

I ended up with 47 lines of mindless, verbose and repeated test code.

Let's fire up GHCi, and see how this works in the REPL. Use the Makefile target make repl-test to try this:

λ> convertToRoman 12
"XII"
λ> convertFromRoman . convertToRoman $ 12
12

OK, I can convert an Arabic number to Roman and convert that back to Arabic, I'll use this mechanism to verify the logic with QuickCheck.

Let's explore QuickCheck in the REPL. Please follow along, but notice, that the generated random numbers are going to be different for you.

λ> import Test.QuickCheck
λ> sample (arbitrary :: Gen Int)
0
-1
-3
-4
-2
-9
8
14
11
-18
-16

It works for Strings as well:

λ> sample (arbitrary :: Gen String)
""
"Q\EOT"
"#8"
"^x"
"&}\t\NULU k"
"\DC4\816800<"
"~!oH\763194&e\GSG"
"\STX\869030\194889\1040760\820031\799098w\SIHz"
"\47452\ETX>j\686979\ACK?\1094610\160069\943268\99807+\519462"
""
"\694257s\883691\996507fO_n4m\tF\357900"

Ok, this is great, but what if you just want random numbers between 1 and 3? Use the elements function:

λ> let oneThroughThree = elements [1..3] :: Gen Int
oneThroughThree :: Gen Int
λ> sample' oneThroughThree
[3,1,3,3,3,1,2,1,3,2,2]

Note that I used the sample' function, which returns a list of elements now.

In case you want to have three with more frequencies, just provide a list accordingly. Like this:

λ> let moreThrees = elements [1,2,3,3,3,3] :: Gen Int
moreThrees :: Gen Int
λ> sample' moreThrees
[1,3,3,3,3,2,3,2,1,1,3]

In the sample list the 3s are represented with higher frequencies.

But what if you want a combination of Strings and Integers for your needs? Well, you can build a short function for that:

import Test.QuickCheck
...
genTuple :: (Arbitrary a, Arbitrary b)
         => Gen (a, b)
genTuple = do
  a <- arbitrary
  b <- arbitrary
  return (a, b)

Fire up the REPL with the test code (I used the included Makefile's repl-test target), and sample this new function to get a list of tuples with Integers and Strings:

λ> import Test.QuickCheck
λ> sample' (genTuple :: Gen (Int, String))
[(0,""),(-1,"P!"),(0,"\703651\888426O"),(-5,"\DLEs_\640436>\a"),(-6,""),(10,"T\45432\&5?\STX.j"),(-10,"h\266318\SUB\175378"),(9,"\ESC\978066"),(16,"FQ@w;'I^\EM\NUL"),(7,""),(12,"\ACK\569630\49462")]

Commit Point

After this brief intro, let's replace the manual tests with generated tests by QuickCheck.

This is the function I came up with to test the logic:

prop_convertNumber :: Int -> Bool
prop_convertNumber x = (convertFromRoman . convertToRoman) x == x

I gave it a try in the REPL:

λ> import Test.QuickCheck
λ> quickCheck prop_convertNumber
*** Failed! Exception: 'Prelude.head: empty list' (after 3 tests and 1 shrink):
-1
λ> quickCheck prop_convertNumber
*** Failed! Exception: 'Prelude.head: empty list' (after 6 tests and 1 shrink):
-1

Oh, crap… QuickCheck generated -1, but my logic only works with positive numbers. I have to tell QuickCheck what numbers it can use.

Commit Point

A valid range needs to be passed to QuickCheck to exercise the number conversion logic, the elements function could do just that. I add these two functions to my test:

numbers :: [Int]
numbers = [1..1000]

genNumbers :: Gen Int
genNumbers = elements numbers

I could easily verify in the REPL that the genNumbers function is producing numbers within the defined range:

λ> import Test.QuickCheck
λ> sample' genNumbers
[745,853,321,678,436,711,825,593,441,900,315]
λ> sample' genNumbers
[706,110,263,36,807,589,555,444,60,261,116]

Great, only positive numbers are generated, I can use this set for my tests. I change the property testing function to use the genNumbers generated values in the test:

prop_convertNumber :: Property
prop_convertNumber =
  forAll genNumbers
    (\x ->
      (convertFromRoman . convertToRoman) x == x)

This works as expected when I test it in the REPL:

λ> import Test.QuickCheck
λ> quickCheck prop_convertNumber
+++ OK, passed 100 tests.

I can now replace all my test with this function:

spec :: Spec
spec = do
  describe "Converting to Roman Numerals" $ do
    it "converts number to Roman and back" $ property $
      prop_convertNumber

Commit Point

Hspec's QuickCheck wrapper provides a convenience function for scenarios like this: I can replace the it and property functions with prop like this (I need to add an import to make this work):

import Test.Hspec.QuickCheck (prop)

...

spec :: Spec
spec = do
  prop "converts number to Roman and back" $
    prop_convertNumber

When I run the tests, they should all pass, and QuickCheck reports back that it generated 100 tests for me.

RomanNumerals
  converts number to Roman and back
    +++ OK, passed 100 tests.

Finished in 0.0017 seconds
1 example, 0 failures

Commit Point

It's great that QuickCheck generates the numbers and runs these tests, however, I would like to look under the hood and see how these conversions are working. I'd like to eyeball what the converted Roman numbers are looking like.

This is all pure code, I can't just print numbers in the terminal. I also don't want to make pure code dirty with IO. Debug.Trace is the solution.

Check this out:

import Debug.Trace
...

prop_convertNumber :: Property
prop_convertNumber =
  forAll genNumbers
    (\x ->
      traceShow("number: ", (x, convertToRoman x)) $
        (convertFromRoman . convertToRoman) x == x)

traceShow will print out both the Arabic and the converted Roman number.

Here is a sample of what I received:

...
("number: ",(825,"XCXCXCXCXCXCXCXCXCXV"))
("number: ",(662,"XCXCXCXCXCXCXCXXXII"))
("number: ",(246,"XCXCLXVI"))
("number: ",(921,"XCXCXCXCXCXCXCXCXCXCXXI"))
    converts number to Roman and back
          +++ OK, passed 100 tests.

          Finished in 0.0030 seconds
          1 example, 0 failures

Oh, that 825 does not look like a valid Roman number. Of course: my conversion table only has values from 1 through 90. It can only convert numbers up to 98. I need to make sure QuickCheck will generate numbers within this range.

numbers :: [Int]
numbers = [1..98]

When I run the tests, I got lucky by QuickCheck, it used 98 for one of the conversions:

...
("number: ",(98,"XCVIII"))
("number: ",(62,"LXII"))
("number: ",(54,"LIV"))
  converts number to Roman and back
      +++ OK, passed 100 tests.

      Finished in 0.0034 seconds
      1 example, 0 failure

All good, now!

Commit Point

QuickCheck has a little brother, called SmallCheck, which will generate numbers up-to a defined depth. It might be a better fit for the Roman Numeral Kata, but that would be a different blog post. I encourage you to explore that library and see how you could change the test code to work with it.


Saturday, October 13, 2018

Haskell by Day

I had played around with Clojure for a couple of years by 2015. I wanted to use it for more than just a toy-project, and when we had to build a data pipeline for my employer, I was more than happy to give it a try.
I hired a developer for our team who had more serious functional programming background than I had. He started doing interesting things with our code base like separating out functions based on purity and using currying like no one I had seen before.

I asked him, how he knows so much about FP. His answer was plain and simple: "I've been learning Haskell." Oh. I have always thought Haskell is this far-out, esoteric, academic language that no one uses. I realized he knew more Clojure just by learning Haskell. Then he showed me Elm and I was blown away. (Elm has its roots in Haskell, it's a similar ML language.)

A couple of months later I watched Chad Fowler's talk about his adventures at WunderList in which he talked about a routing application that they wrote in less than fifty (50) lines of Haskell. It never went done and was blazing fast. His message (the one that I picked up anyway) was "Haskell, Haskell, learn Haskell".

I started digging into the language by following the examples from the book Learn You a Haskell for Great Good. It was an easy read, I was cruising through the examples in GHCi (REPL). Then I stopped looking at the language for about 2-3 months as something came up. I went back to it and was shocked to realize that I did not remember anything. Zero. What the heck is this weird syntax (x:xs)?

I realized reading the book and following the examples in a REPL was not enough, I had to keep coming back to them, and most importantly, practice them. The author of the HaskellProgramming book, Chris Allen had a good talk on how to learn Haskell in less than five years. The message is simple: learn by doing. And keep doing it. This is how my little learning project haskell-katas was born. I needed something I could come back to and practice with. It had mostly helped, but I was still confused by its error messages and type classes, which made more sense by more reading and practice.

I liked my employer, we worked on some interesting problems, but I wanted to try myself on the job market, see how marketable my skills are. At one point I had to solve a Tetris game challenge for a company as a take-home exercise. I knew they were interested in folks with functional thinking. I had no intention working on that problem in Ruby/Python/JavaScript, but I thought it would be interesting to come up with a solution in Haskell. They said I could do it in Haskell and I jumped on the task. I began working on it on a Friday afternoon, played with the problem for an hour or two, I tried to see how I could represent the data with Algebraic Data Types and maybe map the different shapes on the board. When that worked, I knew I'll be able to submit a solution. I worked on it over the weekend and by Monday morning I had the solution working. I submitted my code 3 days early and got invited for an in-person interview. This was the moment I realized I might be able to find a job working with Haskell.

Finding a role with Haskell got more important to me, as the one or two hours here and there in the evening or weekends will never be enough to learn the language fully. I found a job posting on StackOverflow that listed Haskell as a requirement, here in Chicago. I applied, and after a few rounds of interviews I received an offer from them which I accepted.

We are working on a student loan solution for the UK market. Haskell is the brain of the application, all the different calculation models and rules are coded in it. I was intrigued to work for the only company in Chicago that uses Haskell. I started my job about a month ago and boy, it's been an adventure. I feel very slow sometimes, but more productive when I submit a change that makes the code a bit easier to test. For example, I had to dive into a couple of days of learning just to interact with JSON. All in all, I am super happy that I can do something by day that I learned at night, and with this new role I can take my functional programming skills to a new level.

You might ask: How about Ruby? Am I still using? Oh yeah, we have an API app in Rails, plus I started mentoring our intern by pairing with him on different challenges in Ruby a couple of times a week. We also have a fairly significant code base in Python that our data scientists put together to test the Haskell component. I enjoy going into there and help the team make the code better.

The future is polyglot. Follow your heart and work with the language you want to learn. That's the only way to get real deep into it!

Monday, June 18, 2018

Haskell Stack vs. Stackage - Explained

I am sitting in the Denver Airport terminal, waiting for my flight to take me home from Lambda Conf 2018 to Chicago. This conference was the best I have attended in recent years: the quality of the talks, the friendliness of the presenters and the attendees is just something I have not seen in a long time.

I set down next to a guy (Dan Burton to be exact) with my lunch a couple of days ago and I started a conversation with him. When we chatted about open source, he mentioned he works on Stackage. I heard about it, but I asked him to tell me more. I learned quite a bit, I figured others would benefit from having this information, hence the idea of this blog post was born.

Stack came along a couple of years ago to save us all from "Cabal Hell". I never had to experience it as I started learning Haskell only two years ago, long after Stack and Stackage was born. But understanding what they provide helps me appreciate it even more.

When you start a new project with Stack, there is one line in stack.yaml that has significant importance:

resolver: lts-11.11

This value makes the connection between Stack and Stackage.

"What is lts-11.11?" - It's the long term support version of Stackage.
"What is Stackage then?" - It's a set of Haskell tools and libraries tested together in a snapshot making sure that the specified versions work together.
"A snapshot? What's that?" - An LTS or Nightly release of packages.
"Isn't this a lot of work? Testing all these libraries together…" - Oh yes it is, but the good thing is that it’s automated for the most part.
"How many people are working on this?" - Eight, but there are also some devops people at FP Complete that occasionally help with the server.
"How often are the libraries tested?" - There is a nightly snapshot released (almost) every night. There is an LTS snapshot minor bump (e.g. lts-11.11 -> lts-11.12) released (almost) every week. LTS major releases (e.g. lts-11 -> lts-12) are approximately every 3 to 5 months.
"Which one should I use?" - the LTS snapshot of course. Unless you are curious and want to see how a library is changing daily.
"But I have GHC installed globally on my computer. Is that used?" - It depends. If the LTS snapshot you specify in your project uses a different GHC version than what you have outside of Stack, that LTS specified GHC version will be installed.
"Give me an example!" - Sure.

First, let's see what is installed globally. When I run which ghc this is what I get: /usr/local/bin/ghc. And when I peek into this file, I see it points to my homebrew installed ghc, with version 8.4.3:

#!/bin/sh
exedir="/usr/local/Cellar/ghc/8.4.3/lib/ghc-8.4.3/bin"
exeprog="ghc-stage2"
executablename="$exedir/$exeprog"
datadir="/usr/local/Cellar/ghc/8.4.3/share"
bindir="/usr/local/Cellar/ghc/8.4.3/bin"
topdir="/usr/local/Cellar/ghc/8.4.3/lib/ghc-8.4.3"
executablename="$exedir/ghc"
exec "$executablename" -B"$topdir" ${1+"$@"}

Now when I run ghc-pkg list, I see 33 packages installed with this system-level GHC version:

% ghc-pkg list
/usr/local/Cellar/ghc/8.4.3/lib/ghc-8.4.3/package.conf.d
    Cabal-2.2.0.1
    array-0.5.2.0
    base-4.11.1.0
    binary-0.8.5.1
    ...

I have not installed any packages myself into this GHC version, all those 33 packages come with GHC.

I have a project where the resolver is lts-11.11. When I run stack exec -- ghc-pkg list in this project (after it was successfully built of course), the following libraries are listed. I left out the bulk of the libraries, as the key point here is the different layers and not what is in those:

% stack exec -- ghc-pkg list
/Users/adomokos/.stack/programs/x86_64-osx/ghc-8.2.2/lib/ghc-8.2.2/package.conf.d
    Cabal-2.0.1.0
    array-0.5.2.0
    base-4.10.1.0
    ...
/Users/adomokos/.stack/snapshots/x86_64-osx/lts-11.11/8.2.2/pkgdb
    Cabal-2.0.1.1
    HUnit-1.6.0.0
    StateVar-1.1.1.0
    aeson-1.2.4.0
    ...
/Users/adomokos/Projects/persistent-test/.stack-work/install/x86_64-osx/lts-11.11/8.2.2/pkgdb
    katip-0.5.5.1
    persistent-test-0.1.0.0

The 3 paths listed above in this shell snippet is where Haskell packages are pulled from:

  1. Global - the system-level GHC packages list, Stack will never install anything into this
  2. Snapshot - a database shared by all projects using the same snapshot
  3. Local - Project specific database

But wait! What is GHC 8.2.2 doing there? I have version 8.4.3 installed at the system level. As it turns out, Stack, based on the LTS information uses a different version of GHC. I have GHC version 8.4.3 at the system level, but LTS-11.11 uses GHC version 8.2.2.

Let’s prove that out further:

% stack exec -- which ghc
/Users/adomokos/.stack/programs/x86_64-osx/ghc-8.2.2/bin/ghc
% stack exec -- ghc --version
The Glorious Glasgow Haskell Compilation System, version 8.2.2

Ha, Stack rolls its own GHC version and ignores the system-level version if it's different than what it needs. How cool is that!

When I went to Stackage's website, I noticed that a newer version of LTS was released recently. I had LTS-11.11 (released on 05/28/2018), but the latest version is (as of this writing) LTS-11.13 (released on 06/09/2018). I updated stack.yaml to use the newer version and rebuilt the project. Ran the app and everything worked properly.

What changed between the two LTS snapshots? Stackage.org has a very good comparison page, this is where you can follow the diffs. It seems not many of the packages changed that I used, however, postgresql-simple went from 0.5.3.0 to 0.5.4.0. Since LTS-11.13 is specified in stack.yaml and that LTS needs postgresql-simple version 0.5.4.0, what happens when I specify version 0.5.3.0 in package.yaml?

I changed package.yaml this way:

dependencies:
  - base >= 4.7 && < 5
  - postgresql-simple == 0.5.3.0
  ...

When I ran stack build, this friendly error message let me know that I'd like to use a version of a package that is not in the provided LTS snapshot:

Error: While constructing the build plan, the following exceptions were encountered:

In the dependencies for persistent-test-0.1.0.0:
    postgresql-simple-0.5.4.0 from stack configuration
    does not match ==0.5.3.0  (latest matching version
                              is 0.5.3.0)
needed since persistent-test is a build target.

Some different approaches to resolving this:

  * Set 'allow-newer: true' to ignore all version
    constraints and build anyway.

  * Consider trying 'stack solver', which uses the cabal-install
    solver to attempt to find some working build
    configuration. This can be convenient when dealing with many
    complicated constraint errors, but results
    may be unpredictable.

  * Recommended action: try adding the following to your extra-deps
    in /Users/adomokos/Projects/persistent-test/stack.yaml:

- postgresql-simple-0.5.3.0

Plan construction failed.

Once I removed the version specification for the postgresql-simple package, it built successfully. But did it pick the correct version since I did not specify it?

% stack exec -- ghc-pkg list | grep postgresql-simple
    postgresql-simple-0.5.4.0

Yep, the correct, Stackage LTS-11.13 version was in fact installed.

I grabbed all the package names from LTS-11.13, I counted 2474 packages that got tested against each other for this particular LTS release. Kudos to the Stackage Curator Team for making sure we will only use packages that are playing nice with each other!

(Thanks to Dan for proofreading my post, this writing is more accurate with his feedback.)

Thursday, April 19, 2018

Path Count

I've bumped into this brain teaser recently:

"Given two integer numbers describing an n by m graph, where n represents the height and m represents the width, calculate the number of ways you can get from the top left to the bottom right if you can only go right and down"

That's a fine challenge, and prior to knowing recursive types in Haskell, I don’t know how I would have approached the problem.

Let's draw what the paths would look like first.

Given 1x1, the case is pretty simple:

{-
  The is what the matrix would look like:

  (0,1) - (1,1)
    |       |
  (0,0) - (1,0)
-}

The only way to get from the top left to the bottom right is to "walk" the perimeters:

{-
  (0,1) - (1,1) - (1,0)
  (0,1) - (0,0) - (1,0)
-}

This case is so easy, I don’t even bother with devising a solution. Let's look at a 1 by 2 graph:

{-
  (0-1) - (1,1) - (2,1)
    |       |       |
  (0-0) - (1,0) - (2,0)
-}

Following the rules laid out, there are 3 ways to get from the top left to the bottom right point:

{-
  (0-1) - (1,1) - (2,1) - (2,0)
  (0-1) - (1,1) - (1,0) - (2,0)
  (0-1) - (0,0) - (1,0) - (2,0)
-}

The rule "you can only go right and down" tells us something: it's a binary tree. How could I draw up a recursive tree structure for this?

I'd like to make sure the logic is correct, I put all this logic into an HSpec file. How 'bout this?

-- test/PathCountSpec.hs

import Test.Hspec

main :: IO ()
main = hspec spec

type Point = (Int, Int)
data Tree a = Leaf
            | Node a (Tree a) (Tree a)
            deriving (Show, Eq)

spec :: Spec
spec =
    describe "Path Count" $ do
        it "can calculate tree branches for 1x2 matrix" $ do
            let tree =
                    Node (0,1)
                        (Node (1,1)
                            (Node (2,1) Leaf
                                        (Node (2,0) Leaf Leaf))
                            (Node (1,0) (Node (2,0) Leaf Leaf)
                                        Leaf))
                        (Node (0,0)
                            (Node (1,0)
                                (Node (2,0) Leaf Leaf)
                                Leaf)
                            Leaf)
            {-
               Possible paths:
                (0,1) - (1,1) - (2,1) - (2,0)
                (0,1) - (1,1) - (1,0) - (2,0)
                (0,1) - (0,0) - (1,0) - (2,0)
            -}
            pending

The key here, that the number of times Node (2,0) Leaf Leaf appears is the number of different ways I can get from the top left to the bottom right. All I have to do is counting the number of times this sub-tree appears in the tree itself.

I wrote a function (that I put into the HSpec file itself) to do just that:

leafCount :: Tree Point -> Int
leafCount Leaf = 0
leafCount (Node _ Leaf Leaf) = 1
leafCount (Node _ left right) = leafCount left + leafCount right

When I call this function with the provided tree I have in the spec, I should receive 3. This assertion passes:

leafCount tree `shouldBe` 3

I manually had to build up this tree, next I looked at how I could generate it myself based on the top left and bottom right points. I had to make sure I won’t add branches outside of the matrix, what I accomplished with two guards.

buildTree :: Point -> Point -> Tree Point
buildTree (a,b) end@(c,d)
    | a > c = Leaf
    | b < 0 = Leaf
    | otherwise = Node (a, b) (buildTree (a+1,b) end) (buildTree (a,b-1) end)

This logic will keep "walking" right and down until the guards will stop it.

I added another assertion to make sure this still passes:

buildTree (0,1) (2,0) `shouldBe` tree

I wanted to make sure this logic still holds when I pivot the two numbers. This is the next assertion I added:

buildTree (0,2) (1,0) `shouldBe` tree

Tests are passing. All right, I need to set up an outer function that takes two numbers and returns the number of paths.

Here it is:

pathCount :: Int -> Int -> Int
pathCount m n = leafCount $ fromTree m n
    where fromTree m n = buildTree (0,m) (n,0)

This assertion will exercise this function:

pathCount 1 2 `shouldBe` 3

Everything is green!

I added one more test to make sure the 1x1 graph works:

pathCount 1 1 `shouldBe` 2

And finally I added a 2x2 test as well. This one has 6 different paths to get from the top left to the bottom right:

{-
    Possible paths:
    (0,2) - (1,2) - (2,2) - (2,1) - (2,0)
    (0,2) - (1,2) - (1,1) - (2,1) - (2,0)
    (0,2) - (1,2) - (1,1) - (1,0) - (2,0)
    (0,2) - (0,1) - (1,1) - (2,1) - (2,0)
    (0,2) - (0,1) - (1,1) - (1,0) - (2,0)
    (0,2) - (0,1) - (0,0) - (1,0) - (2,0)
-}
pathCount 2 2 `shouldBe` 6

And when I run the spec again, it all works! You can find the solution in this gist.

Sunday, January 28, 2018

Haskell to MySQL via YeshQL (Part 3.)

In the previous blog post we built a console app in Haskell that talks to MySQL via YeshQL. It creates a client record and counts them with a SQL query.
In the final part in this series, we will add automated tests to our application, we will save a user record along with its parent client and make sure all the saving happens in one unit of work.

This is the commit point where we left it at the end of Part 2.

Add Tests

Let’s set up the great testing tool HSpec in our project.

First, replace the content of test/Spec.hs file with this:

{-# OPTIONS_GHC -F -pgmF hspec-discover #-}

This will let auto-discover any spec files we have in the test directory.

Let's add the first test to the project in the test/Hashmir/DataSpec.hs file:

module Hashmir.DataSpec where

import Test.Hspec

main :: IO ()
main = hspec spec

spec :: Spec
spec = do
    describe "Hashmir Data" $ do
        it "runs a test" $ do
            True `shouldBe` True

We are not testing anything real here, we just want to make sure all the building blocks are in place.

Add the test-suite directive to package.yml file:

...

tests:
  hashmir-test:
    source-dirs: test/
    main: Spec.hs
    dependencies:
      - hashmir
      - hspec == 2.*
    other-modules:
      Hashmir.DataSpec

make build should recompile the app, and stack test will run the entire test suite.

When all is good, you should see this:

Hashmir.Data
  Hashmir Data
    runs a test

Finished in 0.0010 seconds
1 example, 0 failures

It wouldn't save much typing, but I like navigating the projects I am working on from a Makefile, I added these changes to run the tests with make test:

...
test: ## Run the specs
  @stack test

.PHONY: help test

Commit point

Verify Client Create Logic

Creating a record in the database is easy, we already verified it when we ran the app. However, making this automated and repeatable shows some challenges. We need to make sure that every test cleans after itself in the DB. We could wrap each and every spec in a transaction and just roll it back, but that would be quite complex. Dropping and rebuilding the database is fast as it is. Sure, it's a couple of hundred milliseconds, but that is negligible for now.

HSpec provides before hooks, we will hook into that.

Let's change the test/Hashmir/DataSpec.hs like this:

module Hashmir.DataSpec where

import Test.Hspec
import System.Process
import qualified Hashmir.Data as D

main :: IO ()
main = hspec spec

resetDB :: IO ()
resetDB = callCommand "make build-db"

spec :: Spec
spec = before resetDB $ do
    describe "Hashmir Data" $ do
        it "creates a Client record" $ do
            clientId <- D.insertClient "TestClient" "testclient"
            clientId `shouldBe` 1

We call resetDB with every single spec, that function makes a system call to rebuild the DB.

When you try executing the test, stack tries to recompile the app, but it presents an error:

test/Hashmir/DataSpec.hs:4:1: error:
    Failed to load interface for ‘System.Process’
    It is a member of the hidden package ‘process-1.4.3.0’.
    Perhaps you need to add ‘process’ to the build-depends in your .cabal file.

Oh-oh. We need to add the process package to our test-suite, let's modify the package.yml like this:

tests:
  hashmir-test:
    source-dirs: test/
    main: Spec.hs
    dependencies:
      - process
      - hashmir
      - hspec == 2.*
    other-modules:
      Hashmir.DataSpec

After adding the process package, regenerating the cabal file, we can now run our first test successfully:

Hashmir.Data
  Hashmir Data
Dropping and rebuilding database hashmir_test
    runs a test

Finished in 0.1378 seconds
1 example, 0 failures

The beauty of this solution is that we can run it over and over again, the test will pass as the checked clientId will always be 1, since the database is recreated every time.

Commit point

Add a User Record Along With Client

Let's add a failing spec for this first. Add the following content to the test/Hashmir/DataSpec.hs file:

    it "creates a Client and a User record" $ do
        clientId <- D.insertClient "TestClient" "testclient"
        userId <- D.insertUser clientId "joe" "joe@example.com" "password1"
        userId `shouldBe` 1

There is no insertUser function, let's add it. We also need to add the SQL template to the YeshQL code. It's very similar to the Client insert script, here are all the changes for that:

[yesh|
    -- name:countClientSQL :: (Int)
    SELECT count(id) FROM clients;
    ;;;
    -- name:insertClientSQL
    -- :client_name :: String
    -- :subdomain :: String
    INSERT INTO clients (name, subdomain) VALUES (:client_name, :subdomain);
    ;;;
    -- name:insertUserSQL
    -- :client_id :: Integer
    -- :login :: String
    -- :email :: String
    -- :password :: String
    INSERT INTO users (client_id, login, email, password)
    VALUES (:client_id, :login, :email, :password);
|]

And the insertUser function like this:

insertUser :: Integer -> String -> String -> String -> IO Integer
insertUser clientId login email password =
    withConn $ insertUserSQL clientId login email password

When I run make test, this is the output printed on the screen:

Hashmir.Data
  Hashmir Data
Dropping and rebuilding database hashmir_test
    creates a Client record
Dropping and rebuilding database hashmir_test
    creates a Client and a User record

Finished in 0.2642 seconds
2 examples, 0 failures

The lines Dropping and rebuilding database hashmir_test is too much noise, let's remove it from the Makefile.

Hashmir.Data
  Hashmir Data
    creates a Client record
    creates a Client and a User record

Finished in 0.2354 seconds
2 examples, 0 failures

This looks much cleaner.

Commit point

Roll Back Transactions When Error Occurs

The happy path of our application is working well: the User and Client records are inserted properly. First, the Client is saved, its id is used for the User record to establish the proper references. But we should treat these two inserts as one unit of work: if the second fails, it should roll back the first insert.

Let's write a test for it. I'll make the created Client's id intentionally wrong by incrementing it by one.

    it "rolls back the transaction when failure occurs" $ do
        clientId <- D.insertClient "TestClient" "testclient"
        _ <- D.insertUser (clientId + 1) "joe" "joe@example.com" "password1"
        clientCount <- D.withConn $ D.countClientSQL
        clientCount `shouldBe` Just 0

When I run the tests, this is the error I am getting:

Hashmir.Data
  Hashmir Data
    creates a Client record
    creates a Client and a User record
    rolls back the transaction when failure occurs FAILED [1]

Failures:

  test/Hashmir/DataSpec.hs:23:
  1) Hashmir.Data, Hashmir Data, rolls back the transaction when failure occurs
       uncaught exception:
           SqlError (SqlError {seState = "",
               seNativeError = 1452,
               seErrorMsg = "Cannot add or update a child row: a foreign key constraint
                             fails (`hashmir_test`.`users`, CONSTRAINT `client_id`
                             FOREIGN KEY (`client_id`) REFERENCES `clients` (`id`))"})

Randomized with seed 668337839

Finished in 0.3924 seconds
3 examples, 1 failure

The database is protecting itself from an incorrect state, a User record won't be saved with an id that does not match a record in the clients table. This exception is justified, although, it could be handled better with a Maybe type, that's not the point right now. Let's just expect this exception for now to see a proper test failure.

Change the test like this:

    it "rolls back the transaction when failure occurs" $ do
        clientId <- D.insertClient "TestClient" "testclient"
        (D.insertUser (clientId + 1)
                      "joe"
                      "joe@example.com"
                      "password1")
            `shouldThrow` anyException
        clientCount <- D.withConn $ D.countClientSQL
        clientCount `shouldBe` Just 0

The spec now produces the error I would expect:

Failures:

  test/Hashmir/DataSpec.hs:31:
  1) Hashmir.Data, Hashmir Data, rolls back the transaction when failure occurs
       expected: Just 0
        but got: Just 1

Randomized with seed 1723584293

Finished in 0.3728 seconds
3 examples, 1 failure

Finally, we have a spec that fails correctly, as we are not rolling back the created Client record.

The reason the Client record is not rolled back is that we use two different transactions to persist the records: first, the Client record is saved and the connection is committed, and then the User record is attempted to be saved. It fails, the record is not created, but the Client record has already been committed to the database. This is our problem, we should reuse the same connection for both save operations, and only commit it after the second one.

Let's refactor the code to do that. Both the insertClient and insertUser now accept a connection:

insertClient :: H.IConnection conn =>
                      String -> String -> conn -> IO Integer
insertClient name subdomain =
    insertClientSQL name subdomain

insertUser :: H.IConnection conn =>
                    Integer -> String -> String -> String -> conn -> IO Integer
insertUser clientId login email password =
    insertUserSQL clientId login email password

The specs now has to be modified to pass in the connection:

spec :: Spec
spec = before resetDB $ do
    describe "Hashmir Data" $ do
        it "creates a Client record" $ do
            clientId <- D.withConn $ D.insertClient "TestClient" "testclient"
            clientId `shouldBe` 1
        it "creates a Client and a User record" $ do
            userId <- D.withConn (\conn -> do
                clientId <- D.insertClient "TestClient" "testclient" conn
                D.insertUser clientId "joe" "joe@example.com" "password1" conn)
            userId `shouldBe` 1
        it "rolls back the transaction when failure occurs" $ do
            (D.withConn (\conn -> do
                clientId <- D.insertClient "TestClient" "testclient" conn
                D.insertUser (clientId+1) "joe" "joe@example.com" "password1" conn))
                `shouldThrow` anyException
            clientCount <- D.withConn $ D.countClientSQL
            clientCount `shouldBe` Just 0

And finally, the Main function has to be updated as well:

main :: IO ()
main = do
    clientId <- D.withConn $ D.insertClient "TestClient" "testclient"
    putStrLn $ "New client's id is " ++ show clientId
    Just clientCount <- D.withConn D.countClientSQL
    putStrLn $ "There are " ++ show clientCount ++ " records."

When you run the tests, they should all pass now.

Commit point

Summary

In this blog series we set up YeshQL, added logic to insert Client and its dependent User records, we added tests and made sure all the writes are in one transaction.

Our final solution works, but it requires the connection to be passed in. Using a Reader Monad would be a more elegant solution, but that should be a different blog post.

Tuesday, December 12, 2017

Haskell to MySQL via YeshQL (Part 2.)

In the previous blog post, we built the skeleton of a console app in Haskell that talks to MySQL via YeshQL. We used a Makefile to rebuild the database, compile the code and run the app. This is the commit point where we left it at the end of Part 1.

In this article we will add functionality to create clients records, we will extract the logic that acquires, commits and closes the connection, and finally, we will move the database related code into its own module.

Insert a Client record

We can query the clients table, however, there are no records in that table. Let's add one script to the SQL template.

Modify the YeshQL templates by adding the following code:

 [yesh|
     -- name:countClientSQL :: (Int)
     SELECT count(id) FROM clients;
     ;;;
     -- name:insertClientSQL
     -- :client_name :: String
     -- :subdomain :: String
     INSERT INTO clients (name, subdomain) VALUES (:client_name, :subdomain);
 |]

Three semicolons are used to separate SQL statements. The -- name is used to provide a function name that we can refer to in our code. The two lines are the input arguments to the generated function. Those arguments are the values in the INSERT statement on the last line.

Let's add the following Haskell function to insert a new Client record:

insertClient :: String -> String -> IO ()
insertClient name subdomain = do
    conn <- getConn
    clientId <- insertClientSQL name subdomain conn
    commit conn
    disconnect conn
    putStrLn $ "New client's id is " ++ show clientId

The generated insertClientSQL (note the name in the SQL template) is invoked with the two specified arguments plus the connection. The uncommitted connection will not write the record to the table, without that statement the countClientSQL function would return 0 records.
Disconnecting a connection is a good practice (if you can't pool those connections), free up resources when you don't need them.

Invoke the created insertClient function from main function like this:

main = do
    insertClient "TestClient" "testclient"
    countClient

When I try to build the app (use make build for it), I get the following errors:

/Haskell/hashmir/app/Main.hs:34:5: error:
    Variable not in scope: commit :: Connection -> IO a0

It turns out that Database.HDBC library is needed to invoke commit and disconnect.
Add the following import statement to the top of the file:

import qualified Database.HDBC as H

Update the function to use the qualified names for the commit and disconnect calls.

insertClient :: String -> String -> IO ()
insertClient name subdomain = do
    conn <- getConn
    clientId <- insertClientSQL name subdomain conn
    H.commit conn
    H.disconnect conn
    putStrLn $ "New client's id is " ++ show clientId

The project should successfully build, when you run the app (use make run to do it), you should see this output:

% make run
Dropping and rebuilding database hashmir_test
time ~/.local/bin/hashmir-exe
New client's id is 1
There are 1 records.

real 0m0.020s
user 0m0.009s
sys 0m0.006s

The database got rebuilt, one client record was inserted and the count function counted that record.

Commit point

Introducing: withConn

Committing and disconnecting a connection is generally a good practice. Let's match the countClient function with the insertClient function and call commit and disconnect the connection there as well.

countClient :: IO ()
countClient = do
    conn <- getConn
    Just (clientCount) <- countClientSQL conn
    H.commit conn -- added line
    H.disconnect conn -- added line
    putStrLn $ "There are " ++ show clientCount ++ " records."

Now both the countClient and the insertClient has the same duplicated logic:

    conn <- getConn
    ...
    H.commit conn -- added line
    H.disconnect conn -- added line

This reminds me of the use of withFile from the IO module. withFile accepts a lambda where the handle is passed to it and the code in the lambda can use the provided handle. We need the same thing here, withConn would accept an active connection. Consider this function:

withConn :: (Connection -> IO b) -> IO b
withConn f = do
    conn <- getConn
    result <- f conn
    H.commit conn
    H.disconnect conn
    return result

Our refactored insertClient function would look like this:

insertClient :: String -> String -> IO ()
insertClient name subdomain = do
    clientId <-
        withConn (\conn -> do
            insertClientSQL name subdomain conn
        )
    putStrLn $ "New client's id is " ++ show clientId

When you build the project and run it, it should work without errors.

Commit point

Thanks to Haskell's currying, this function can be further simplified. No need to provide the input argument in the lambda:

insertClient :: String -> String -> IO ()
insertClient name subdomain = do
    clientId <-
        withConn (do insertClientSQL name subdomain)
    putStrLn $ "New client's id is " ++ show clientId

This looks much better, but we can further simplify this code:

insertClient :: String -> String -> IO ()
insertClient name subdomain = do
    clientId <- withConn $ do insertClientSQL name subdomain
    putStrLn $ "New client's id is " ++ show clientId

Now that function is easy to read!

Commit point

Let's refactor the countClient function similarly.

countClient :: IO ()
countClient = do
    Just (clientCount) <- withConn countClientSQL
    putStrLn $ "There are " ++ show clientCount ++ " records."

Commit point

Extract Data Access Logic

Having code that prints information on the screen from the functions that talks with the database makes them mixed with responsibilities. They should only return primitives, and the caller main function should print the reports. Let's make those functions a bit more clean:

insertClient :: String -> String -> IO Integer
insertClient name subdomain = do
    withConn $ do insertClientSQL name subdomain

countClient :: IO (Maybe Int)
countClient = do withConn countClientSQL

I really like how Haskell makes the functions that uses IO impure or dirty: once they have been tainted, they are tainted. You should always try to isolate functions that are tainted from the pure ones as the pure ones are easier test - they have no side effects.

The main function is now responsible for reporting the result:

main :: IO ()
main = do
    clientId <- insertClient "TestClient" "testclient"
    putStrLn $ "New client's id is " ++ show clientId
    Just clientCount <- countClient
    putStrLn $ "There are " ++ show clientCount ++ " records."

Commit point

Move Data Logic Into a Library

Our Main.hs file has all the application logic. It looks pretty solid, let's move it into a library module. Copy all database access related code from app/Main.hs into src/Hashmir/Data.hs file like this:

{-#LANGUAGE TemplateHaskell #-}
{-#LANGUAGE QuasiQuotes #-}

module Hashmir.Data where

import Database.YeshQL
import qualified Database.HDBC as H
import Database.HDBC.MySQL

[yesh|
    -- name:countClientSQL :: (Int)
    SELECT count(id) FROM clients;
    ;;;
    -- name:insertClientSQL
    -- :client_name :: String
    -- :subdomain :: String
    INSERT INTO clients (name, subdomain) VALUES (:client_name, :subdomain);
|]

getConn :: IO Connection
getConn = do
    connectMySQL defaultMySQLConnectInfo {
        mysqlHost     = "localhost",
        mysqlDatabase = "hashmir_test",
        mysqlUser     = "hashmir_user",
        mysqlPassword = "shei7AnganeihaeF",
        mysqlUnixSocket = "/tmp/mysql.sock"
    }

withConn :: (Connection -> IO b) -> IO b
withConn f = do
    conn <- getConn
    result <- f conn
    H.commit conn
    H.disconnect conn
    return result

insertClient :: String -> String -> IO Integer
insertClient name subdomain =
    withConn $ insertClientSQL name subdomain

countClient :: IO (Maybe Int)
countClient = withConn countClientSQL

This is the same logic we had in the app/Main.hs file, but now it is in the Hashmir.Data module.

The Main module becomes small once we remove all the code we just moved out of it:

module Main where

import qualified Hashmir.Data as D

main :: IO ()
main = do
    clientId <- D.insertClient "TestClient" "testclient"
    putStrLn $ "New client's id is " ++ show clientId
    Just clientCount <- D.countClient
    putStrLn $ "There are " ++ show clientCount ++ " records."

We also have to tell Cabal where it can find this code. Change the Lib directive to Hashmir.Data in the package.yaml:

library:
  source-dirs: src/
  exposed-modules:
    - Hashmir.Data

The project should build and when you run the app it should insert and return the number of clients records:

% make run
Dropping and rebuilding database hashmir_test
time ~/.local/bin/hashmir-exe
New client's id is 1
There are 1 records.

real 0m0.022s
user 0m0.010s
sys 0m0.007s

Commit point

This last change wraps up our Part 2 in this series. We can now create clients records, count them with a simple withConn function that properly opens, commits and closes the connection.

In the third post in this series, I will show you how we can insert two records in one transaction, how we can deal with errors and how this logic can be tested.

Thursday, November 30, 2017

Haskell to MySQL via YeshQL (Part 1.)

As I was looking for an easy way to talk to Postgres from Clojure, I discovered Yesql. I wanted to find something similar in Haskell, and I found YeshQL. It's a template parsing library on top of HDBC, exactly what I needed to keep SQL and Haskell code separate.

This blog post will show you how you can easily get YeshQL up and running and run queries against MySQL. I'll build a simple CRUD console app that you can follow along, I'll list commit points at the end of each section.

The Clojure tutorial I created for my blog posts is named Kashmir, I'll name this project Hashmir.

You will need stack and ghc installed, I have stack Version 1.5.1 x86_64 hpack-0.17.1 and ghc version 8.0.2. MySQL is also needed, I have version 5.7.20, but I won't use anything fancy as far as the database goes, if you have MySQL installed, I am sure that will do it.

Generate the project with stack

Generate the project with this command: stack new hashmir. Go inside the directory, build and deploy the app with stack build && stack install. Run the skeleton app:

% ~/.local/bin/hashmir-exe
someFunc

Commit point

Using hpack

Since I learned about hpack, I never touch a Haskell project's cabal file any more. This blog post assumes you are familiar with this tool, feel free to learn about hpack more before you proceed.

Add this package.yaml to the project's root directory:

name: hashmir
version: 0.1.0.0
author: Attila Domokos <adomokos@gmail.com>
maintainer: adomokos@gmail.com
copyright: 2017 Attila Domokos
category: Console App
homepage: https://github.com/adomokos/hashmir#readme

ghc-options: -Wall

dependencies:
  - base >= 4.7 && < 5

library:
  source-dirs: src/
  exposed-modules:
    - Lib

executables:
  hashmir-exe:
    source-dirs: app/
    main: Main.hs
    dependencies:
      hashmir
    ghc-options: -threaded -rtsopts -with-rtsopts=-N

Feel free to use your name and Github repo in this file.
Delete and regenerate the project's cabal file with this command: rm -f hashmir.cabal && stack build. stack install should produce the same executable file.

Commit point

Setting up the Database

We will need a MySQL user and a database we can use in this project. Let's add a Makefile to script that out for us. You might need the master or root user in MySQL to create a role and grant access. If the Makefile target does not work, just log on to the MySQL console with your root account and add the role and grant access with the scripts you see in the Makefile.

This is the schema file we will work with. I won't include it in this post, but this script should drop and recreate the tables. Put it into the ./resources directory.

These targets in the Makefile will create the role and will rebuild the database:

create-db-user: ## Creates a DB user with the root MySQL user
    mysql -u root --host $(HOST) -e "CREATE USER '$(DBUSER)'@'$(HOST)' IDENTIFIED BY '$(DBPASSWD)';" > /dev/null 2>&1
    mysql -u root --host $(HOST) -e "GRANT ALL PRIVILEGES ON `$(DBNAME)`.* TO '$(DBUSER)'@'$(HOST)';" > /dev/null 2>&1

build-db: ## Builds the DB
    @echo "Dropping and rebuilding database $(DBNAME)"
    @mysql -u $(DBUSER) --password='$(DBPASSWD)' --host $(HOST) -e "DROP DATABASE IF EXISTS $(DBNAME);" > /dev/null 2>&1
    @mysql -u $(DBUSER) --password='$(DBPASSWD)' --host $(HOST) -e "CREATE DATABASE $(DBNAME);" > /dev/null 2>&1
    @mysql -u $(DBUSER) --password='$(DBPASSWD)' --host $(HOST) $(DBNAME) < resources/schema.sql > /dev/null 2>&1

You should be able to execute make build to rebuild the app, and make run to rebuild the DB and run the app:

% make run
Dropping and rebuilding database crud_yeshql_test
time ~/.local/bin/hashmir-exe
someFunc

real    0m0.011s
user    0m0.002s
sys 0m0.007s

Commit point

Writing the First Query

There are two parts of using YeshQL's code:

  1. The SQL templates
  2. Code that uses the generated functions from the template

Modify the app/Main.hs file like this:

{-#LANGUAGE TemplateHaskell #-}
{-#LANGUAGE QuasiQuotes #-}

module Main where

import Database.YeshQL
import Database.HDBC.MySQL

[yesh|
    -- name:countClientSQL :: (Int)
    SELECT count(id) FROM clients;
|]

getConn :: IO Connection
getConn = do
    connectMySQL defaultMySQLConnectInfo {
        mysqlHost     = "localhost",
        mysqlDatabase = "hashmir_test",
        mysqlUser     = "hashmir_user",
        mysqlPassword = "shei7AnganeihaeF",
        mysqlUnixSocket = "/tmp/mysql.sock"
    }

countClient :: IO ()
countClient = do
    conn <- getConn
    Just (clientCount) <- countClientSQL conn
    putStrLn $ "There are " ++ show clientCount ++ " records."

main :: IO ()
main = countClient

When you try to build the project (I conveniently use make build) one of these errors are displayed:

Failed to load interface for 'Database.YeshQL'

I started referencing Database.YeshQL, however, I did not add that library to the project. This is where hpack is helpful, we only have to add it to the package.yaml file, that will generate a cabal file with the correct references.

Let's modify the dependencies section of package.yaml file like this:

...

dependencies:
  - base >= 4.7 && < 5
  - yeshql
  - HDBC
  - HDBC-mysql

...

When I try to build the project, I get the following error:

Error: While constructing the build plan, the following exceptions were encountered:

In the dependencies for hashmir-0.1.0.0:
    yeshql must match -any, but the stack configuration has no specified version (latest applicable is 3.0.1.3)
needed since hashmir-0.1.0.0 is a build target.

Recommended action: try adding the following to your extra-deps in ~/hashmir/stack.yaml:
- yeshql-3.0.1.3

By modifying the extra-deps: [] array like this in stack.yaml

extra-deps: [
    yeshql-3.0.1.3
]

will download YeshQL for the project and build it successfully.

When I run the app (use make run to do it), this is what I see:

% make run
Dropping and rebuilding database hashmir_test
time ~/.local/bin/hashmir-exe
There are 0 records.

real    0m0.019s
user    0m0.009s
sys 0m0.006s

YeshQL generated a function on-the-fly, named countClientSQL. That's the function I invoked in the countClient function. Since there are no records in the table, 0 was returned from the function.

Commit point

We set up the project, ran the first query against MySQL from Haskell via YeshQL templates. This brings us to the end of part 1 of this series. In the next article, we'll start adding more SQL queries to insert and query various records.

Friday, August 25, 2017

String Calculator with Applicative Functors in Haskell

I like the simplicity of the String Calculator kata. It's a typical example of the map-reduce algorithm, where the string has to be split by a delimiter, mapped into a list of integers and then reduced to their sum. I have often used it as an example to quickly evaluate engineering candidates, try new languages and tools. This was the first challenge I tried to solve in Haskell about a year ago. I found the code the other day, I wanted to see how I could improve upon it with everything I've learned so far.

This is what I found from a year before:

import Test.Hspec
import Data.List.Split (splitOn)

calculator :: String -> Integer
calculator x = sum $ coerceString x ","

coerceString :: String -> String -> [Integer]
coerceString x c = map (coerce) (splitOn c x)
    where
        coerce "" = 0
        coerce a = read a :: Integer

main :: IO ()
main = hspec $ do
    describe "String Calculator" $ do
        it "returns 0 for empty string" $ do
            calculator "" `shouldBe` 0
        it "returns 1 for '1'" $ do
            calculator "1" `shouldBe` 1
        it "returns 3 for '1,2,3'" $ do
            calculator "1,2,3" `shouldBe` 6

This works for simple cases, but what should I do when there is a non-numeric string in the input arguments?

        it "returns 0 for '1,2,!'" $ do
            calculator "1,2,!" `shouldBe` 0

The algorithm crashes as I suspected:

String Calculator
  returns 0 for empty string
  returns 1 for '1'
  returns 3 for '1,2,3'
  returns 0 for '1,2,!' FAILED [1]

Failures:

  string_calculator_01.hs:22:
  1) String Calculator returns 0 for '1,2,!'
       uncaught exception: ErrorCall (Prelude.read: no parse)

Randomized with seed 1943023196

Finished in 0.0023 seconds
4 examples, 1 failure

I could easily wrap the entire logic and return zero when an exception occurs, however, Haskell can do better. Much better.

I can return a Maybe Int from the operation that parses the string to an integer: if the result is Nothing here, the overall result will be Nothing.
There is a string parser in the Text.Read module that does just that, it's called readMaybe.

Here is how it works:

 % ghci
GHCi, version 8.0.2: http://www.haskell.org/ghc/  :? for help
Loaded GHCi configuration from /Users/adomokos/.ghci
λ> import Text.Read
λ> (readMaybe "12") :: Maybe Int
Just 12
λ> (readMaybe "!") :: Maybe Int
Nothing
λ>

I need to parse the list of strings, which is achieved by mapping over the values with readMaybe:

GHCi, version 8.0.2: http://www.haskell.org/ghc/  :? for help
Loaded GHCi configuration from /Users/adomokos/.ghci
λ> import Text.Read (readMaybe)
λ> import Data.List.Split (splitOn)
λ> let xs = "1,2,3"
λ> splitOn (",") xs
["1","2","3"]
λ> map (\x -> readMaybe x :: Maybe Int) $ splitOn (",") xs
[Just 1,Just 2,Just 3]

I now have a list of Maybe Int values that can be reduced into a single Maybe Int value. Reducing an array of numbers would be super easy (foldl (+) 0 [1,2,3] or foldl1 (+) [1,2,3] or just simply sum [1,2,3]). It's obvious that I will need something similar.

Adding a number to a Maybe Int can be achieved with a Functor:

λ> fmap (+10) (Just 4)
Just 14
λ> (+10) `fmap` (Just 4)
Just 14
λ> (+10) <$> Just 4
Just 14

All three expressions mean the same thing. The first is using the fmap as a conventional function name and arguments style, the second one uses the infix version of fmap and the third one is using a symbol.

This works for adding a number to a Maybe Int, however, I need to use an Applicative Functor to calculate the sum of two Maybe Ints.

λ> (+) <$> Just 10 <*> Just 4
Just 14

Using Applicative Functors, folding the list of Maybe Ints happens like this:

λ> let xs = [Just 1, Just 2, Just 3]
λ> foldl (\acc x -> (+) <$> x <*> acc) (Just 0) xs
Just 6
λ> foldl1 (\acc x -> (+) <$> x <*> acc) xs
Just 6

The solution now works, although a bit hard to read:

import Test.Hspec
import Text.Read (readMaybe)
import Data.List.Split (splitOn)

calculator :: String -> Maybe Int
calculator input =
    foldr (\x acc -> (+) <$> x <*> acc) (Just 0) $
        map (\x -> readMaybe x) $ splitOn "," input

main :: IO ()
main = hspec $ do
    describe "String Calculator" $ do
        it "returns Nothing for empty string" $ do
            calculator "" `shouldBe` Nothing
        it "returns Just 1 for '1'" $ do
            calculator "1" `shouldBe` Just 1
        it "returns Just 3 for '1,2,3'" $ do
            calculator "1,2,3" `shouldBe` Just 6
        it "returns Nothing for '1,2,3,!'" $ do
            calculator "1,2,3,!" `shouldBe` Nothing

It's more meaningful after I've refactored it into chunks:

calculator :: String -> Maybe Int
calculator input =
    let foldingFn acc x =  (+) <$> acc <*> x
        parsedInts = map (\x -> readMaybe x) . splitOn (",")
    in foldr1 (foldingFn) (parsedInts input)

The parsedInts function can be further simplified:

calculator :: String -> Maybe Int
calculator input =
    let foldingFn acc x =  (+) <$> acc <*> x
        parsedInts = map (readMaybe) . splitOn (",")
    in foldr1 (foldingFn) (parsedInts input)

And finally, the sum of list of Maybe values can be calculated by using the sequence function like this:

calculator :: String -> Maybe Int
calculator input =
    let parsedInts = map (readMaybe) . splitOn (",")
    in fmap sum . sequence $ parsedInts input

I find this form to be the most readable, but I liked the journey of getting there through the Applicative Functors.

Wednesday, June 28, 2017

Scenario Outline in RSpec

Some business logic is best described in a table format. The rows and columns can better detail all the different permutations, than words and sentences. Gherkin handles this well with its scenario outlines, however, RSpec does not have such feature.

As I wanted to test all the different permutation of a business logic, I ended up with a ~200 lines spec file. It was hard to review what use cases were covered as I had to scroll up and down to review the file. Had RSpec have a table format, this logic could have been described in 40 lines, which can easily fit into a screen.

It was obvious a simple DSL was needed, but what would that look like? This is what I came up with first:

RSpec.describe 'eating apples' do
  def method_under_test(start, eat, left)
    start - eat == left
  end

  def example_runner(examples)
    lines = examples.split(/\n/)
    lines.delete_at(0) # Don't need the title
    lines.each do |line|
      example = line.split('|')
      start, eat, left = example.reject(&:blank?).map(&:to_i)
      expect(method_under_test(start, eat, left)).to eq(true)
    end
  end

  it 'can tell how many are remaining' do
    examples =
      <<~TABLE
        | start | eat | left |
        | 12    | 5   | 7    |
        | 20    | 5   | 15   |
      TABLE

    example_runner(examples)
  end
end

I am using the example_runner method to parse the examples table and run the specs one by one. The spec itself is clear, the examples TABLE is easy to visualize.

The spec documentation, however, does not reveal the used table. This is what it looks like:

eating apples
  can tell how many are remaining

Let’s say, one of the examples will trigger an error. When I change the second example’s “left” column’s 15 value to 16, this is what I see when I run the spec.

F

Failures:

  1) eating apples can tell how many are remaining
     Failure/Error: expect(method_under_test(start, eat, left)).to eq(true)

       expected: true
            got: false

       (compared using ==)

This is not very useful. I don’t know which example failed. Fortunately RSpec lets us provide more context for an expectation. When I change the line of the assertion with an added context like this,

expect(method_under_test(start, eat, left)).to eq(true), line

the example that failed is properly reported by RSpec:

F

Failures:

  1) eating apples can tell how many are remaining
     Failure/Error: expect(method_under_test(start, eat, left)).to eq(true), line
       | 20    | 5   | 16   |

This could be a decent solution, however, not printing the examples for the documentation output has major drawbacks. Every row in the table should be a separate example, it should be expressed as such. With some clever formatting and using include_example a similar table layout can be achieved. Consider this example:

RSpec.describe 'eating apples' do
  def method_under_test(start, eat, left)
    start - eat == left
  end

  RSpec.shared_examples 'eating_apples' do |example|
    it "calculates the remaining apple for - #{example}" do
      parsed_example = example.split('|')
      start, eat, left = parsed_example.reject(&:blank?).map(&:to_i)

      result = method_under_test(start, eat, left)
      expect(result).to eq(true)
    end
  end

                                     # start | eat | left
                                     # ______|_____|_____
  include_examples 'eating_apples', '  12    | 5   | 7'
  include_examples 'eating_apples', '  20    | 5   | 15'
end

The table is shifted to the right, but it’s clearly visible, and the commented out header provides a different color in my IDE that separates it from the data.

include_examples

The shared_example is also a lot simpler, I don’t need to deal with the header information, as it’s not passed to it, examples are being ran line by line.

By making the test description dynamic, the reporter prints out the tested values:

eating apples
  calculates the remaining apple for -   12    | 5   | 7
  calculates the remaining apple for -   20    | 5   | 15

The triggered error is properly reported by both the line number and the example used for that particular use case.

.F

Failures:

  1) eating apples calculates the remaining apple for -   20    | 5   | 16
     Failure/Error: expect(result).to eq(true)

       expected: true
            got: false

       (compared using ==)

I am not a big fan of adjusted white space for positioning equal signs under one another, but am happy to use white space to format test code to better describe the logic it validates.

RSpec does not have scenario outlines, but hopefully, with a shared_example and a bit of clever formatting the same can be accomplished.

Wednesday, May 31, 2017

Bit Shifting for a Shard ID in Ruby

As our database grew, we had to take a serious look at how can we could split it up by our clients, as most of them wanted to have their own data separate from the others anyway. A few months ago I found a great article from Pinterest, that describes how they sharded their MySQL database.

A sharded entity needs a UUID to uniquely identify the record across all shards. Most of the programming languages can generate a UUID easily, however, what was amazing to me, was that Pinterest generated its own unique ids by encapsulating three distinct numbers in one. Wait, what??! Read that article, it’s definitely worth your time.

While Pinterest encapsulated three numbers into one, we only needed two, a client_id and an entity_id. Our client_id would be a much smaller number than our entity_id, we wanted to reserve more bits for the latter.

It turns out, Ruby has many friendlier tools to deal with binary operations. Let's look at them!

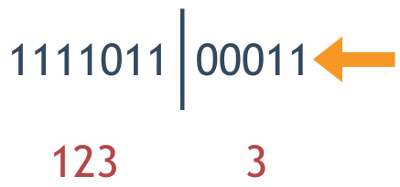
What is the binary representation of the integer number 123?

123-in-binary

Out of the 7 bits, you'll see that the 3rd one is turned off, all the others are turned on, giving us 64 + 32 + 16 + 8 + 2 +1 = 123. How can we get this binary representation in Ruby? It's super easy, just use the to_s(2) method to do it.

pry(main)> 123.to_s(2)
=>"1111011"

This is the exact same string representation as the one in the image above, where the third bit is turned off and represented with a zero.

I'd like to keep the client_id on the left side, but I'd like to reserve bits on the right side. For the sake of simplicity, I will keep this as a small number. Let's add 5 bits to the right-hand side of these bits by using the bitwise left shift operator.

pry(main)> (123 << 5).to_s(2)
=> "111101100000"

The original number, 123, is still represented on the left side, but 5 "0"s were added to the right-hand side. You get the numeric representation of this by leaving out the to_s(2) call at the end:

pry(main)> 123 << 5
=> 3936

This number can be converted back to binary:

pry(main)> 3936.to_s(2)
=> "111101100000"

On the left side I have the binary representation of 123, but how about those bits on the right side? What are those representing? Right now, those bits are all turned off, they will give you 0 ("00000".to_i(2) => 0). How can I store the number 3 on the right side? The bits should look like this:

3-on-right-side

The binary "|" will turn the two rightmost bits on:

pry(main)> (123 MM 5 | 3).to_s(2)
=> "111101100011"

Again, leaving out the to_s(2) will provide the number representation:

pry(main)> (123 << 5 | 3)
=> 3939

The storing part will work, but how can we get our two numbers back from this one combined number? Well, we have to split the bits and convert the binary representation to an integer.

Five bits were used on the right side to store our second number. We need to chop those off to get the number stored on the left side. The bitwise right shift (>>) will do just that:

pry(main)> (3939 >> 5).to_s(2)
=> "1111011"

The string "1111011" is our original 123 in a binary string format. We can convert that to an integer by using the to_i(2) String method:

pry(main)> (3939 >> 5).to_s(2).to_i(2)
=> 123

I right shifted the original number, 3939, converted it to a binary string and converted that to an Integer.

There are more efficient ways to do this by using a binary "&" (3939 >> 5) & 0b1111111 => 123 with the max value the bits can represent. That's what the Pinterest article had, but I found using the Ruby conversion methods a bit more friendly to those of us who are not dealing with binary data on a daily basis.

We have the number on the left side, but what about the number on the right side? When we convert the number representation (3939) to a binary string, we know that the five characters on the right side will represent the bits of our other number. Ruby String’s last(x) will do just that:

pry(main)> (3939 >> 0).to_s(2).last(5)
=> "00011"

Converting this binary String to Integer should be similar to what we've done before:

pry(main)> (3939 >> 0).to_s(2).last(5).to_i(2)
=> 3

Using the binary "&" with the max number the bits can store will do this conversion in one step: (3939 >> 0) & 0b11111 => 3. As a side note, the binary number can be represented as a hexadecimal value: (3939 >> 0) & 0x1F => 3. This is a lot shorter than a series of ones and zeros.

There is a limit of how large the numbers can be as you have a limit of bits to store those. The max number can be determined by flipping the available bits on. For an 7 bit number it's 64 + 32 + 16 + 8 + 4 + 2 + 1 = 127 or 2**x-1, where x is the number of bits. In our case it is 2**7-1 = 127.

We ended up using a 64-bit Integer for our shard_id, which is a BIGINT in MySQL. We store client_id in 22 bits giving us the maximum of 2**22-1 = 4_194_304 and 40 bits for the entity_id with 2**40-1 = 1_099_511_627_775 max value. The remaining two bits are "worth in gold, we can expand the number or store a third (albeit small) number in it.

Tuesday, April 25, 2017

Fireside Chat

When I saw a retweet from Jason Fried about available tickets to a fireside chat with him at Basecamp, I jumped on it. I figured if I can kill two birds with one stone, - meeting him in person and seeing their offices - it's a no-brainer. Company Culture was the topic of the conversation led by Aimee Groth, who visited Chicago to publicize her new book, Kingdom of Happiness about Zappos' culture.

Basecamp HQ

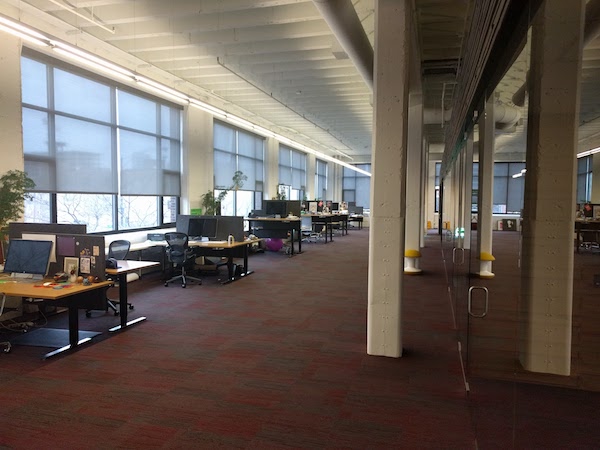
Basecamp HQ is as cool as you think it is. Very few desks, a couple of meeting rooms. It reminded me more of a train terminal with its large windows and limited furnishing than a real office. The office is centered around an auditorium, which is an effective PR and educational platform for the company.

I enjoyed looking at the walls covered with postcards from employees all over the world, but I especially liked David's H-1B approval notice from the USCIS from 2005. I laughed out loud when I noticed it, as I had to go through similar hassle myself, but mine is safely guarded with my documents at home.

Basecamp works in six weeks work schedule. Whatever the team can get down in six weeks, they will deliver it. The scope can change, but the six weeks schedule is hard set. This timeframe helps them delivering functionality, and since the company is working remotely, it worked out well for them.

They don't have managers who only manage people or projects, the teams are led by team leads. These team leads are developers as well, shipping code on a daily basis. Jason and his team realized that managers who do not code, grow away from the work. According to him, "professional (full time) managers forget to do the work".
At one point they've tried rotating team leads, but that did not work out, as the continuity was lost. I could see that: "I see this problem, but I won't deal with it, I'll leave it for the next person, who will take over." Basecamp is looking for people who are self-managed, however, Jason emphasized multiple times: "people like to be led". It's important to "rally the folks by clear goals and purpose".

Jason also talked about the Jeff Bezos investment in the company, which meant a small ownership stake in Basecamp. They did not need the money to survive, David and Jason felt having a person like Mr. Bezos is mutually beneficial to both parties. "Who would not like to have Jeff Bezos as an advisor in his or her company?!" They have not talked to Jeff Bezos for a while, but if they wanted to, they could just reach out to his secretary, set up a meeting, and Jeff would fly to Chicago for a meeting or dinner with them.

The best advice from Bezos - and according to Jason, this was worth the entire dividend they have paid for his investment - was: "invest in the things in your business, that won't change". Don't chase the shiny new things, stick to what will not change. For them, it's Basecamp. The company had 4-5 products that they sold a couple of years ago to focus on their main product, which is Basecamp.

Jason went into details why other products were divested (like HighRise, Backpack, Campfire). Maintaining the web, Android and iOS versions of their products resulted in 15 different projects. That led to insufficient focus for each platform for each product with the employees they had at the time. They could - of course - have hired other developers, but they intentionally wanted to stay small. They did not want to get richer, be the next billionaire, they were just as happy with what they had. This sounds strange, almost naive in the era of bloated startups that are bleeding money chasing to be the next Facebook.

I enjoyed the Q&A at the very end. Some interesting questions came up about the startup community in Chicago, about VCs in general. Jason kindly offered to stay as long as everybody's questions were answered. Really a courteous offer, considering it was after 8 pm on a Friday night.

Oh, yes, and one more thing: Basecamp has 130,000 paying customers. It's a remarkable achievement by a company that has never taken VC money, was profitable from the get-go, and created an exciting app in the "not-so-exciting" domain of project management.

Tuesday, March 28, 2017

Containers

As I was exploring how to make Golang even faster on AWS Lambda, I found a project that promised sub-millisecond execution time compared to my (already pretty good) ~60 millisecond. It used Python execution that ran the Go code in-process in contrast to my attempt, where I had to spawn a new process and execute the lambda code there. Very clever, no wonder that solution did not have the 60-millisecond penalty for running that code. However, in order to build the sample code for this AWS Lambda I had to use Docker.

I've heard about Docker years ago, understood what it's used for at a very high level, however, I have never really given it a serious try. I figured it was time. Boy, I was in for some pleasant surprise!

The project AWS Lambda Go from Eawsy used Docker to containerize their build environment on my laptop. What does that mean? Imagine having a build server running on your computer in seconds, where the version of the Go compiler, the Python environment is set by the author of the Dockerfile. I'd use a little build engine that takes in my code, runs its magic and a zip file comes out that I can run on Lambda. What?!

I wrote all these different tutorials about running MRI Ruby on AWS Lambda or interacting with a Postgres DB with Clojure and I had to set up all the prereqs in plain text: "you have to have Postgres running, and Clojure, and MRI Ruby". I provided all the different Makefile scripts to follow the examples. However, with Docker, I'd just provide a Dockerfile that sets up the environment in the future.

I believe containers are big and will be even bigger very soon.

I see more and more applications where the code describes the behavior and the container descriptor describes the environment.


They live side by side, clearly stating what virtual components the software needs to execute. Engineers can run the software with those containers locally, and the software can be deployed to the cloud with those images pre-built, with tight control over its execution context.

There are many resources to learn Docker. I started with reading the Docker in Action book and went further by reading the Docker in Practice book.

I created a Docker templates repository, where I collected ideas for different recipes. Do I need a Ruby worker with Redis and Postgres backend? I'll just run docker compose up with this docker_compose.yml file and I have an environment, where everything from the OS to the version of Redis and Postgres is predefined. If it works on my machine, it will work on yours, too.

There are many things I like about Docker as compared to Vagrant or other virtual machine solutions. The biggest thing for me is the low power Docker containers would need. Vagrant images would reserve 2 of your 4 cores and 8GB memory when Docker will only take from the host as much as it needs. If it's 32MB, that's it, if it's 1GB, it will take that much.

Docker is the future, and you will see more and more code repos with a Dockerfile in it.

Wednesday, February 8, 2017

Golang

The first time I heard about Golang was a few years back, when the great guys at Brad's Deals, our next door office neighbor organized and hosted the local Go meetup there. Then IO.js and Node.js war broke out and TJ Holowaychuck shifted from Node.js to Golang announcing the move in an open letter to the community.
I did not think much of the language, as its reputation was far from the beauty of a real functional language.

Fast forward a couple of years and I am giving Ruby a serious try on AWS Lambda. Ruby works there, however, it needs enough memory and 3000 ms (3 seconds) to do anything. We have to invoke some of them millions of times in a month and when we calculated the cost for it, the bill gets fairly large quickly.

I created a simple AWS Lambda with Ruby just to print the words "Hello, World!" with 128 MB memory. It took 5339 ms to execute it.

Ruby Hello World on AWS Lambda

Then one night I wrote a tiny Go program:

package main

import "fmt"

func main() {
  fmt.Println("Hello, World!")
}

I cross compiled (since I am working on OSX) with the command GOOS=linux GOARCH=amd64 go build github.com/adomokos/hello to Linux, packaged it up with a Node.JS executor and ran it. I couldn't believe my eyes, it took only 68 ms to get the string "Hello, World!" back. 68 ms! And it was on a 128 MB memory instance. It was beautiful!

Go Hello World on AWS Lambda

Ruby would need four times the memory and it would still execute ~10 times slower than Go. That was the moment when I got hooked.

Go is a simple language. I am not saying it's easy to learn, it's subjective: it depends on your background, your experience. But it's far from the beauty of Haskell or Clojure. However, the team I am working with would have no trouble switching between Go and Ruby multiple times a day.

What kind of a language today does not have map or reduce functions?! Especially when functions are first-class citizens in the language. It turns out, I can write my own map function if I need to:

package collections

import (
  "github.com/stretchr/testify/assert"
  "strconv"
  "testing"
)

func fmap(f func(int) string, numbers []int) []string {
  items := make([]string, len(numbers))

  for i, item := range numbers {
    items[i] = f(item)
  }

  return items
}

func TestFMap(t *testing.T) {
  numbers := []int{1, 2, 3}
  result := fmap(func(item int) string { return strconv.Itoa(item) }, numbers)
  assert.Equal(t, []string{"1", "2", "3"}, result)
}

Writing map with recursion would be more elegant, but it's not as performant as using a slice with defined length that does not have to grow during the operation.

History

Go was created by some very smart people at Google, I wanted to understand their decision to keep a language this pure.
Google has a large amount of code in C and C++, however, those languages are far from modern concepts, like parallel execution and web programming to name a few. Those languages were created in the 60s and 80s, well before the era of multi-core processors and the Internet. Compiling a massive codebase in C++ can easily take hour(s), and while they were waiting for compilation, the idea of a fast compiling, simple, modern language idea was born. Go does not aim to be shiny and nice, no, its designers kept it:

  • to be simple and easy to learn
  • to compile fast
  • to run fast
  • to make parallel processing easy

Google hires massive number of fresh CS graduates each year with some C++ and Java programming experience, these engineers can feel right at home with Go, where the syntax and concept is similar to those languages.

Tooling

Go comes with many built-in tools, like code formatting and benchmarking to name the few. In fact I set up Vim Go that leverages many of those tools for me. I can run, test code with only a couple of keystrokes.

Let's see how performant the procedure I wrote above is. But before I do that I'll introduce another function where the slice's length is not pre-determined at the beginning of the operation, this way it has to auto-scale internally.

func fmapAutoScale(f func(int) string, numbers []int) []string {
  // Initialize a slice with default length, it will auto-scale
  var items []string

  for _, item := range numbers {
    items = append(items, f(item))
  }

  return items
}

The function is doing the same as fmap, similar test should verify the logic.

I added two benchmark tests to cover these functions:

// Run benchmark with this command
// go test -v fmap_test.go -run="none" -benchtime="3s" -bench="BenchmarkFmap"
// -benchmem
func BenchmarkFmap(b *testing.B) {
  b.ResetTimer()

  numbers := []int{1, 2, 3, 4, 5, 6, 7, 8, 9, 10}
  for i := 0; i < b.N; i++ {
    fmap(func(item int) string { return strconv.Itoa(item)  }, numbers)
  }
}

func BenchmarkFmapAutoScale(b *testing.B) {
  b.ResetTimer()

  numbers := []int{1, 2, 3, 4, 5, 6, 7, 8, 9, 10}
  for i := 0; i < b.N; i++ {
    fmapAutoScale(func(item int) string { return strconv.Itoa(item)  },
    numbers)
  }
}

When I ran the benchmark tests, this is the result I received:

 % go test -v fmap_test.go -run="none" -benchtime="3s" -bench="BenchmarkFmap"
    -benchmem
 BenchmarkFmap-4   ‡ 10000000 | 485 ns/op | 172 B/op | 11 allocs/op
 BenchmarkFmapAS-4 ‡ 5000000  | 851 ns/op | 508 B/op | 15 allocs/op
 PASS
 ok   command-line-arguments  10.476s

The first function, where I set the slice size to the exact size is more performant than the second one, where I just initialize the slice and let it autoscale. The ns/op displays the execution length per operation in nanoseconds. The B/op output describes the bytes it uses per operation. The last column describes how many memory allocations it uses per operation. The difference is insignificant, but you can see how this can become very useful as you try writing performant code.

Popularity

Go is getting popular. In fact, very popular. It was TIOBE's "Language of the Year" gaining 2.16% in one year. I am sure you'll be seeing articles about Go more and more. Check it out if you haven't done it yet, as the chance of finding a project or job that uses Go is increasing every day.