
It was May 2015 at the AWS Summit in Chicago, where I first heard about AWS Lambda. The company I worked for used Linode at that time, I had no chance of using it, but I still found the serverless concept fascinating.

The bulk of my work at my current gig is about transforming data: we pull it from an API, we need to transform and load it into our own data store. Sure the worker boxes can do the job, but maintaining a series of these instances takes effort. AWS Lambda would be the perfect solution for us, but Amazon does not support Ruby natively, which is most of our business logic is written in.
AWS, as of this writing, offers Lambda for three main platforms: Java, Node.JS, and Python. I played around running Clojure on it, which worked as the code is compiled into a jar file, but our current app - due to its monolithic nature - can’t support any other languages just yet.
Amazon claims you can run your language of choice on AWS Lambda, Ruby included, but I have not found a comprehensive guide that would describe how. Once you can package up your app to run as an executable, you can run it. I found this blog post that describes how Swift code can be bundled, deployed and invoked on AWS Lambda. It was clear to me that this solution would work, I only had to package Ruby with its own interpreter to accomplish the same. I looked for tools that can do this and found Traveling Ruby. You can package your code and run it as an executable on the user’s computer, no local Ruby installation is needed. I wanted to try it locally first, thinking if it works there (on OSX), it should work on AWS Lambda as well.
This blog post is a step-by-step tutorial to run MRI Ruby on AWS Lambda. You can follow along with the accompanying project, I listed commit points at the end of each section.
This tutorial assumes you are familiar with AWS, you have access to the AWS Management Console and you have the AWS Command Line Interface configured to interact with your services via the terminal.
You'll need the same version of Ruby as the one Traveling Ruby offers. The latest there is Ruby 2.2.2, I'd recommend installing that through Rbenv or RVM.
1. Setting up the project
I named the project aws-lambda-ruby and created a directory structure like this:
- aws-lambda-ruby
    |- hello_ruby
         |- lib
             |- hello.rb
I put this code in the hello.rb file:
puts 'Hello from Ruby!'
I made sure my Ruby version in the project is 2.2.2 by setting it with Rbenv.
$: cd hello_ruby && ruby lib/hello.rb
Hello from Ruby!
2. Execute the Ruby Code with Traveling Ruby
Create a directory under the project root directory with the name resources. Your directory structure should look like this:
- aws-lambda-ruby
    |- hello_ruby
    |- resources
Download the Ruby runtimes from Traveling Ruby's S3 bucket into the resources directory. I only needed the OSX version for local development and the Linux x86_64 version for AWS. My directory had these two files in it:
- aws-lambda-ruby
    |- hello_ruby
    |- resources
         |- traveling-ruby-20150715-2.2.2-linux-x86_64.tar.gz
         |- traveling-ruby-20150715-2.2.2-osx.tar.gz
Create two new directories for assembling the project under OSX and Linux X86_64 like these:
- aws-lambda-ruby
    |- hello-2.0.0-linux-x86_64
    |- hello-1.0.0-osx
    |- hello_ruby
    |- resources
Add a Makefile to the project under the root directory, we want to automate all the different steps as early as possible. Create a Make target to package and run the code on OSX like this:
run: ## Runs the code locally
    @echo 'Run the app locally'
    @echo '-------------------'
    @rm -fr $(OSXDIR)
    @mkdir -p $(OSXDIR)/lib/ruby
    @tar -xzf resources/traveling-ruby-20150715-2.2.2-osx.tar.gz -C $(OSXDIR)/lib/ruby
    @mkdir $(OSXDIR)/lib/app
    @cp hello_ruby/lib/hello.rb $(OSXDIR)/lib/app/hello.rb
    @cp resources/wrapper.sh $(OSXDIR)/hello
    @chmod +x $(OSXDIR)/hello
    @cd $(OSXDIR) && ./hello
Traveling Ruby suggests running the app through an executable shell script, that's what the resources/wrapper.sh file is:
#!/bin/bash
set -e

# Figure out where this script is located.
SELFDIR="`dirname \"$0\"`"
SELFDIR="`cd \"$SELFDIR\" && pwd`"

# Run the actual app using the bundled Ruby interpreter.
exec "$SELFDIR/lib/ruby/bin/ruby" "$SELFDIR/lib/app/hello.rb"
If you have all the right files in the correct directories and your Makefile has the run target with the code above when you execute make run, this is what you should see in your terminal:
$: make run
Run the app locally
-------------------
Hello from Ruby!
We ran the Ruby code with the Traveling Ruby packaged Ruby runtime, not with the locally installed Ruby, that was set up with a Ruby version manager.
3. Package the Code for AWS Lambda
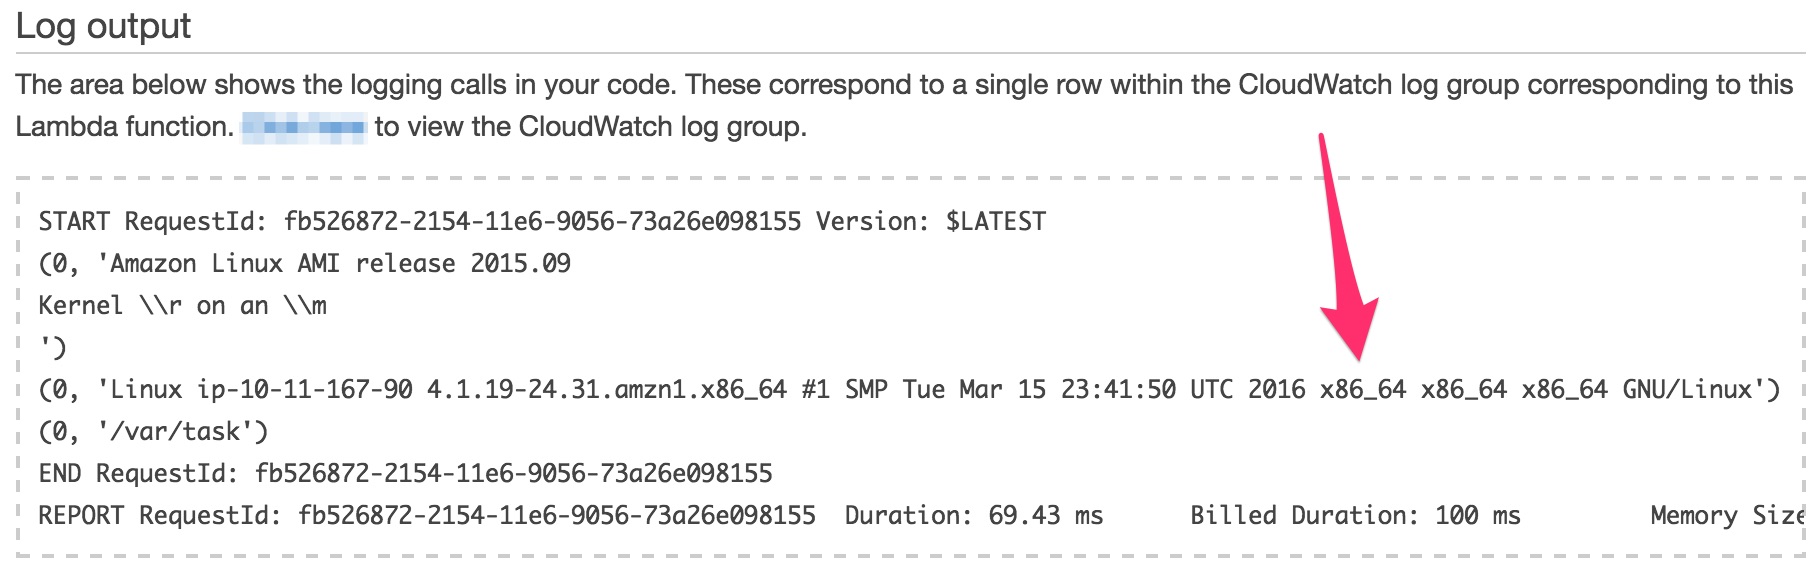
We need to package the code for AWS Lambda after running the app locally on OSX. You can easily check the Lambda runtime by running an AWS Lambda function with Python. Create a new AWS Lambda with the "hello-world-python" template with this Python code in it:
from __future__ import print_function

import json
import commands

print('Loading function')

def lambda_handler(event, context):
    print(commands.getstatusoutput('cat /etc/issue'))
    print(commands.getstatusoutput('uname -a'))
    print(commands.getstatusoutput('pwd'))
There are plenty of tutorials out there to guide you through creating an AWS Lambda, please Google the solution if you don’t know what to do. When you run it, this is the information you should get:
We will use Node.js to execute the code, place this JavaScript file in your resources directory with the name index.js:
process.env['PATH'] = process.env['PATH'] + ':' + process.env['LAMBDA_TASK_ROOT']

var exec = require('child_process').exec;
exports.handler = function(event, context) {
  var command = `./hello`;
  child = exec(command, {env: {'LD_LIBRARY_PATH': __dirname + '/lib'}}, function(error) {
    // Resolve with result of process
    context.done(error, 'Process complete!');
  });
  // Log process stdout and stderr
  child.stdout.on('data', console.log);
  child.stderr.on('data', console.error);
};
The index.handler will be invoked by Lambda, which will spawn a new child process by executing the hello shell script, which will run the Ruby code with Traveling Ruby.
The package Make target will assemble the directory for AWS Lambda and compress it into a zip file. This is how that code looks:
LAMBDADIR=hello-1.0.0-linux-x86_64

...

package: ## Package the code for AWS Lambda
    @echo 'Package the app for deploy'
    @echo '--------------------------'
    @rm -fr $(LAMBDADIR)
    @rm -fr deploy
    @mkdir -p $(LAMBDADIR)/lib/ruby
    @tar -xzf resources/traveling-ruby-20150715-2.2.2-linux-x86_64.tar.gz -C $(LAMBDADIR)/lib/ruby
    @mkdir $(LAMBDADIR)/lib/app
    @cp hello_ruby/lib/hello.rb $(LAMBDADIR)/lib/app/hello.rb
    @cp resources/wrapper.sh $(LAMBDADIR)/hello
    @chmod +x $(LAMBDADIR)/hello
    @cp resources/index.js $(LAMBDADIR)/
    @cd $(LAMBDADIR) && zip -r hello_ruby.zip hello index.js lib/
    @mkdir deploy
    @cd $(LAMBDADIR) && mv hello_ruby.zip ../deploy/
    @echo '... Done.'

...
I only list the content that I added, the run target is still in the Makefile but I omitted it here for brevity. When you execute make package, you should see the following output:
$: make package
Package the app for deploy
--------------------------
... Done.
and a hello_ruby.zip file should be created in your deploy directory.
4. Deploy the Packaged Ruby Code to AWS Lambda
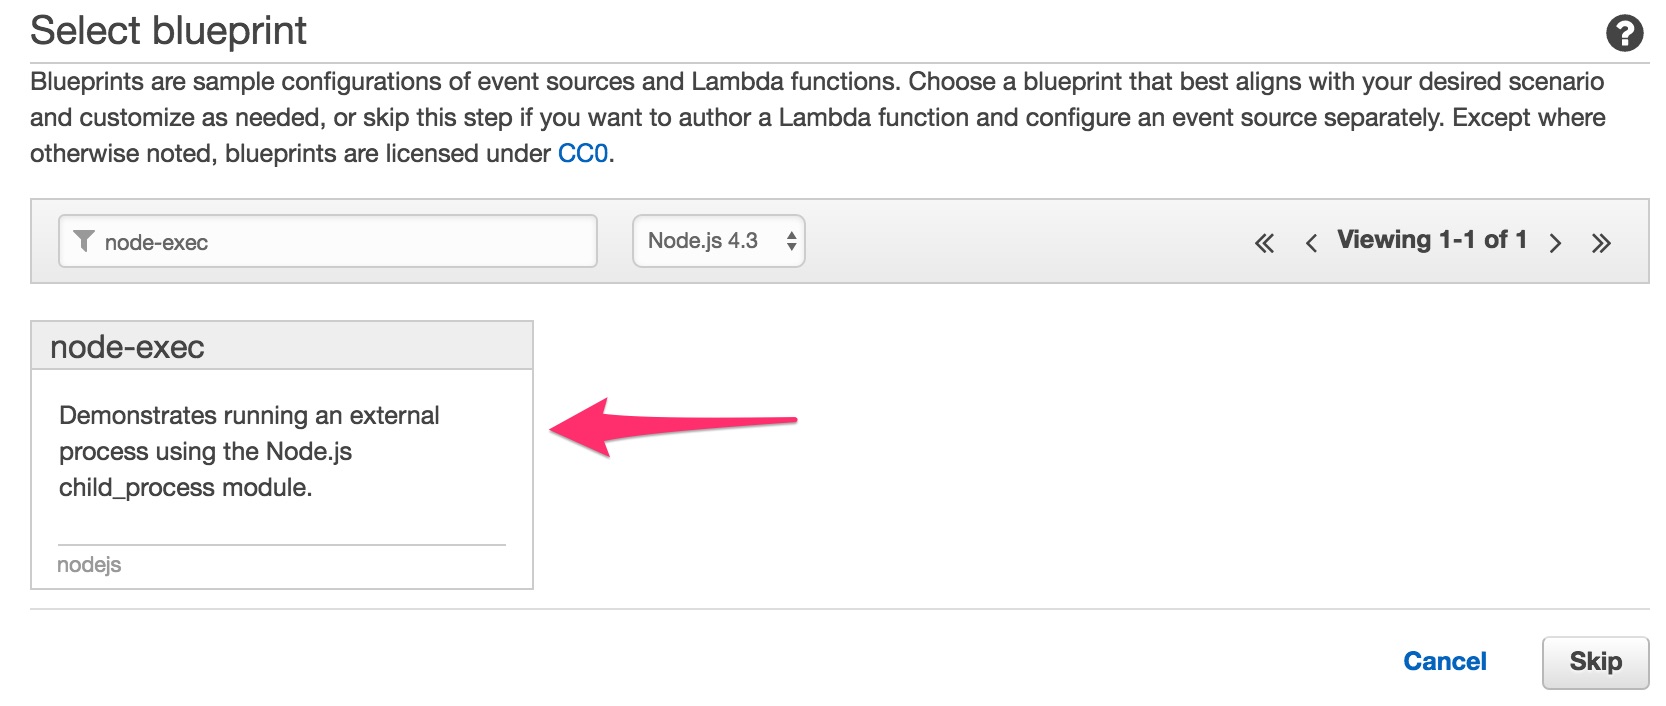
We created a hello_ruby.zip file in the previous section, let's deploy this zip file to AWS Lambda. Open the AWS Management Console and select "Lambda" from the options. Your created Lambdas (if you had any) are listed here. Let’s start creating a new one by clicking on the "Create a Lambda function" button. Select the "node-exec" template:
Fill out the form as you see it in this screenshot:
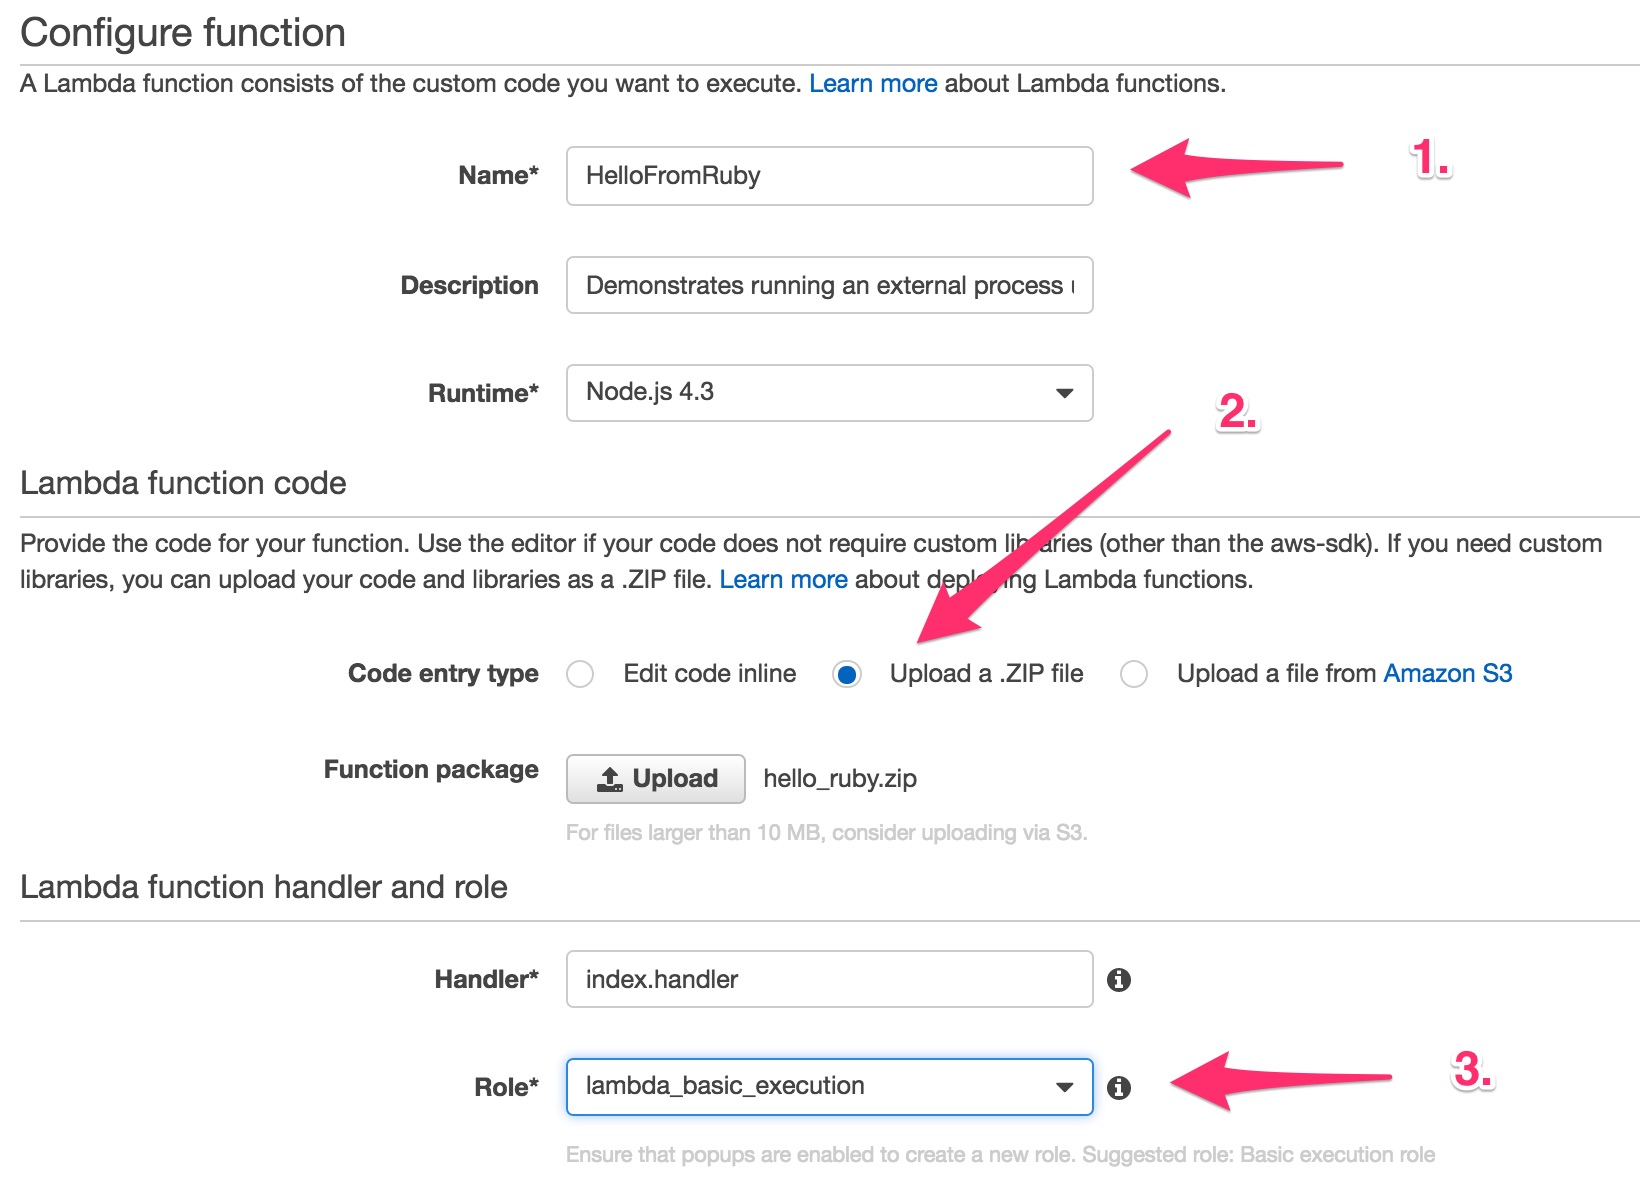
- Name it "HelloFromRuby"
- Chose the option of "Upload a .ZIP file"
- Use the
lambda_basic_executionrole, if you don’t have it, create it
Confirm it and create the Lambda function.
Test the function by clicking on the blue "Test" button. You can accept the HelloWorld test template, those arguments are going to be ignored for now. You should see the following output:
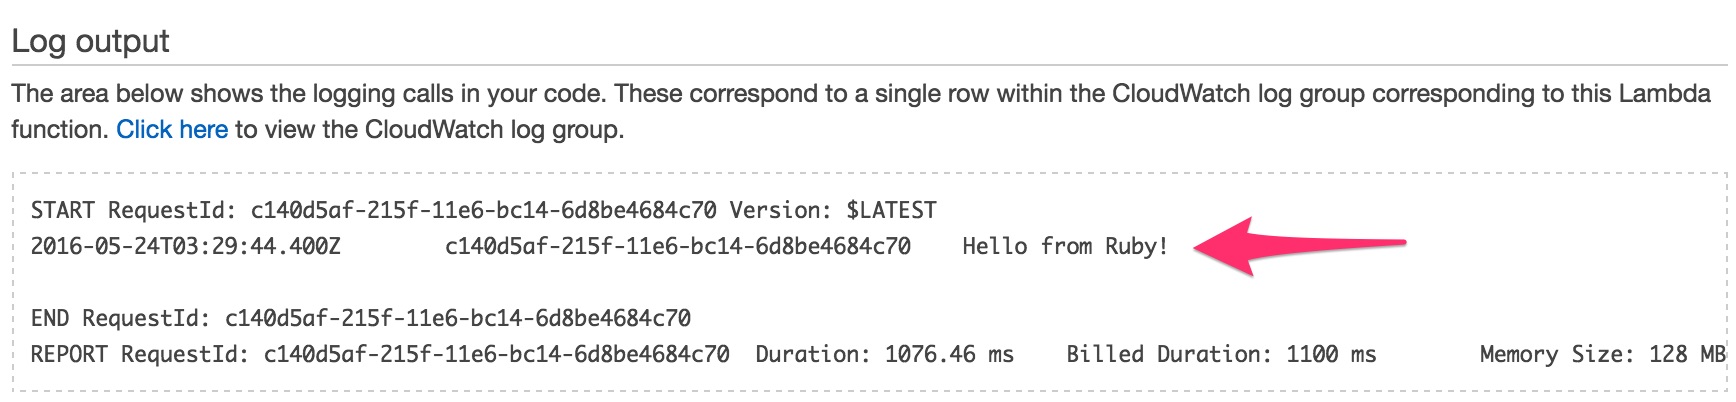
The string "Hello from Ruby!" is coming from the Ruby code executed by Traveling Ruby, just like we did locally.
Woohoo! Congrats, you’ve just created an AWS Lambda function with MRI Ruby.
5. Use the AWS Command Line Interface to Publish an AWS Lambda Function
Although creating a Lambda through the GUI works, it's not something I'd do in the long run. The steps of dropping and creating Lambdas can be automated through the AWS Command Line Interface, those scripts can be easily executed from a Make target. Let's add a new target to drop the already existing Lambda function:
(This blog post assumes you already know how to use the AWS Command Line Interface, you have it configured properly. There is good documentation around this, please look it up and set it up for yourself.)
...

delete: ## Removes the Lambda
    aws lambda delete-function --function-name HelloFromRuby

...
Your 'HelloFromRuby' Lambda function will be deleted when you run make delete in your terminal. Go back to the AWS Management Console to verify that your Lambda function got deleted.
Add your lambda with the following script in your Make file:
...
create: ## Creates an AWS lambda function
aws lambda create-function \
--function-name HelloFromRuby \
--handler index.handler \
--runtime nodejs4.3 \
--memory 512 \
--timeout 10 \
--description "Saying hello from MRI Ruby" \
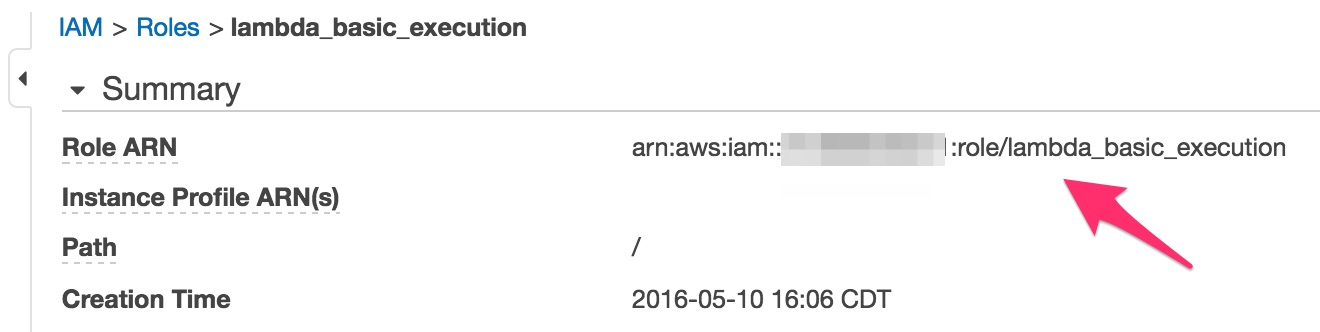
--role arn:aws:iam::___xyz___:role/lambda_basic_execution \
--zip-file fileb://./deploy/hello_ruby.zip
...
I masked the role argument, you need to find your correct "Role ARN" value under Security -> IAM -> Roles. You should look for it here:
If everything is configured properly, you should be able to create your AWS Lambda function by running make create in the terminal.
We can invoke the lambda from the command line as well, this Make target will do just that:
...

invoke: ## Invoke the AWS Lambda in the command line
    rm -fr tmp && mkdir tmp
    aws lambda invoke \
    --invocation-type RequestResponse \
    --function-name HelloFromRuby \
    --log-type Tail \
    --region us-east-1 \
    --payload '{"name":"John Adam Smith"}' \
    tmp/outfile.txt \
    | jq -r '.LogResult' | base64 -D

...
Please note, that I am using a lightweight JSON parser, jq to extract information from the response. You should see the following response from AWS Lambda:
START RequestId: e8c24c91-2165-11e6-a0b6-35430628271f Version: $LATEST
2016-05-24T04:13:46.403Z        e8c24c91-2165-11e6-a0b6-35430628271f

Hello from Ruby!

END RequestId: e8c24c91-2165-11e6-a0b6-35430628271f
REPORT RequestId: e8c24c91-2165-11e6-a0b6-35430628271f
       Duration: 214.12 ms
       Billed Duration: 300 ms
       Memory Size: 512 MB
       Max Memory Used: 20 MB
This blog post guided you through the steps of running MRI Ruby on AWS lambda. In the upcoming post, I'll show you how you can add gems and talk with an RDS instance from your Ruby code on AWS Lambda.